

.avif)
.svg)
Please note that 'Variables' are now called 'Fields' in Landbot's platform.
If you work in marketing and/or sales, you’re probably not unfamiliar with lead qualification.
While traditional methods such as cold calling or web forms can still get the job done, they come with limitations. Chatbots, on the other hand, can take lead qualification to the next level, improving response times, personalization, and conversion rates while automating the entire process.
In this article, we’ll walk you through how chatbots can enhance lead qualification and show you how to build your own lead qualification bot using Landbot.
What is a Lead Qualification Chatbot?
A lead qualification chatbot is an automated conversational assistant designed to identify, engage, and qualify leads in real time. Instead of asking prospects to fill out static forms, it interacts naturally with them through a conversation, asking tailored questions, gathering data, scoring leads, and routing high-quality prospects straight to sales.
Think of it as your always-on sales assistant that instantly identifies who’s worth following up with, without making your leads wait or your team guess.
Step-by-step Guide to Building a Lead Qualification Chatbot
To build this lead qualification bot, I will be using, quite naturally, the Landbot chatbot development platform. So, if you want to follow along, go ahead and sign in to your account, or sign up if you don’t already have one.
With Landbot’s No-Code Builder
The first approach we’ll teach you is to build a lead qualification chatbot from scratch, including how to:
- Integrate your bot with Google Sheets to export lead data;
- Validate a business email;
- Assign a value to prospects’ answers to calculate the lead score;
- Diverge flow with conditional logic;
- Send Slack Notifications;
- Set up Human Takeover.
Have a peek at the final end-user experience:
1. Select Channel & Create New Bot
First things first. On your Landbot dashboard, click on “Build a chatbot” in the upper right corner and select the kind of bot you’re going to launch:

In this case, we’ll go with “Web” and select the “Start from scratch” option.
2. Optimize Welcome Message
When you access the builder, you will see the “Starting point” block, where your chatbot flow begins. From there, you’ll add a new block with your “Welcome message.”
I optimized my Welcome message block as follows, setting up the flow to divide based on the user’s language of preference:

3. Create a New Data Entry with Google Sheets Integration
When it comes to lead qualification, you can integrate Landbot with any CRM. Landbot offers native Salesforce and Hubspot integrations, but you can also set up a webhook to connect to any other system, such as Airtable.
For the purpose of this tutorial, I decided to export my collected data to Google Spreadsheets.
Before you do anything in your chatbot flow, create a new sheet in your Google Drive, where you’ll name the columns for each piece of lead information you want to collect.

Now, go back to the Landbot builder.
Draw an arrow from whichever language flow you want to build first, and select the “Google Sheets” option in the “Integrations” section of the menu.

Suppose you are using this integration for the first time, before anything else, you need to log into your Google account to connect it to Landbot. Otherwise, just select your account from the dropdown list.
After you select an account:
- Pick the spreadsheet you’ve created for this integration;
- Designate the sheet within that spreadsheet you want to access;
- Pick the action you want to perform.

In this case, we want to insert a new row and update the first column, “Lead ID,” with a Landbot variable @id, which stores an automatically created conversation reference number.
After selecting the “Insert new row” action to perform, a new field called “NEW ROW VALUE” will appear. Here, all you need to do is select the name of the column under which you want to store the information and assign it a designated variable from the list (or create a new one).
Since @id is a pre-existing Landbot system variable, all that needs to be done is to select it from the variable list:

Click “Apply” to save your changes and continue.
4. Start Asking Questions
The advantage of the Landbot builder is that most of the common questions (such as date, address, email, phone number) you want to ask your leads have their own format-sensitive block. Hence, for example, the “Email” question block will only accept answers in the correct email format (including @ and .example).
The first question my lead qualification bot will ask is the prospect’s name. While this block doesn’t really have a restricted format since names are diverse, it does come with an already set “variable” under which I can store the collected data.

Better yet, I can use the @name variable to personalize the conversation right from the start.
You can continue to ask about the lead’s company name, the URL, phone number, postcode, and whatever information you need to assess the quality of the prospect.
TIP: If you need to ensure that some of this information is in a specific format (so as not to cause problems in your system) such as all-lower-case or following a specific sequence of numbers or letters (e.g. postcode) to check validity, you can use the Formulas block.
5. Validate Email Using a Webhook
The next question I want my prospect to answer — and perhaps the most important one — is their email address.
The Landbot builder offers an email-designated block that checks for the format and comes with a pre-set variable.

However, since I want to ensure the prospect’s quality, I also want the bot to check if the email submitted is a business email. Sure, step one is to update the question to “What’s your business email?”. But that might not do the trick. If you want qualified leads, you need to ensure the contact information is valid.
To do that, you need to set up a webhook. I know it sounds complex, but setting up a webhook with Landbot, especially the email validator one, is extremely simple.
Draw an arrow from the email block and select “Webhooks” from the “Low code” section of the menu:

Before anything else you need to choose an external email validator where you will send the submitted email address for verification. I am using Apilayer’s mailboxlayer.com, but you can choose any API you feel comfortable with.
Sign in and access your account dashboard:

Here, copy the highlighted information under the “Validate Email Address” section and remove all the spaces between the individual lines to create a URL.
Now copy and paste that URL in the “URL & Method” field in the Webhook settings and set the action to “GET” as we are trying to retrieve information.
Next, activate the “Customize Body?” section to indicate what information you will be sending for verification. In the case of email, the customized body section will look like this:

When done, scroll down and click on the “Test the request” button to test the Webhook setup. If everything is working correctly, the status will be 200 and a bunch of data about the email address will appear in the “Test Response” body.

Now, to ensure the email is a valid business email, I won’t need all of this information. So, the next step is selecting the ones that matter to my objective.
Scroll even further and activate the section “Save Responses as Variables”.
Next, all you need to do is:
- Click on “Select data from the response”;
- Select the data you want to save;
- Associate the data with the Landbot variable to save it.
If you don’t know what the data points mean, you can always check the API documentation. For the purpose of verifying the lead’s email address, I chose to save the following information:
- Score: presents email quality score on a scale of 0 to 1
- Disposability: whether or not the email is temporary
- SMTP check: detects whether or not the requested domain is configured to receive email
- Free: checks whether or not the requested email address is a free email address
I selected these options in the “Save Response as Variables” field and created a variable to store and represent them in the Landbot builder matrix.

6. Set Up Conditions Based on Email Validation Results
Now that we have the results, we can use them to prompt the lead to submit the correct information in case there is an issue.
Draw an arrow from a green output of the Webhooks block and select “Conditions” from the “Logic” section of the menu.
My first condition will regard the “free” status of the email address.

So, if this condition turns out to be correct – IF @email_free EQUALS True – then the email the lead submitted is a generic free email. In that case, all you need to do is draw an arrow from the green output (because the condition was true) and ask for the email again:

NOTE: Make sure your new “Email” question links back to the Webhook for another check!

Besides checking whether or not the email is a business email, it’s also useful to check that email actually works. So, if the lead’s answer successfully passes the first condition (meaning the @email_free status was false), set up another one, this time conditioning the @email_smtp.
The second condition will be set as follows:
IF @email_smtp EQUALS False THEN…
If the conditions are true and @email_smtp does equal “False” it means the domain is not receiving emails. Here you can give the lead the option to resubmit the email address or just go with it. You can still let them follow the conversation, no harm there as it will be clear their email is not valid and so not worth pursuing.

In any case, once that you collected the first piece of actionable data, you can already export it to Google Sheets.
First, you need to set the action to “Update a row” since we have already created a row with the lead’s ID at the beginning of the conversation. Then, set the reference column as the “Lead ID” and select the information to be added to the row.

In this case, we’d select not just the name but all the variables related to the email verification conditions. This way, the bot can tell if the lead is submitting a generic free email or a fake paid one. When all the data is submitted correctly, the info will appear on your spreadsheet.
TIP: As you may have noticed, email validation takes up quite a bit of space in the builder. If you want to keep your flow clean and organized, you can group individual blocks into a brick (which is what I’m using.) You can also rename the brick to not forget what’s inside it. But, the best of all is you can save that brick in your personal brick library and reuse it in other bot you create!
7. Set Up a Scoring System Using “Set a Variable” Block
Now that we have our email, let’s check out how you can give your bot lead scoring abilities. All you need is the list of questions you want to ask your lead, the scoring system you wish to use, and a lead scoring guide that will ensure you don't stray from best practices.
TIP: To make things easier for you, make sure you have your questions, answers, and answer score values ready!
Let’s take, for instance, our WhatsApp solution product as an example.
When it comes to WhatsApp, it’s important to differentiate between businesses that are:
- Already using WhatsApp’s native solution;
- Already using a WhatsApp solution with a different provider;
- Just discovering the idea of WhatsApp communication and want to learn more:
So, in our sample lead scoring bot, I decided to use this question to set off the screening process.

Note: Insert Google Sheets integration at any point in your flow at which you want to upgrade your database. You can do it throughout or wait until the end but using the update action throughout the flow will ensure you can capture partial data as well.
Usually, businesses that are still in the exploratory learning phase and are not using WhatsApp are not ready to speak to a sales rep or commit to a purchase. Here, the best chance of conversion is letting them explore and try the product on their own. So, instead of scoring right off the bet, I took advantage of the buttons and split the flow apart from the rest, leading the “learners” directly to a demo, free trial, webinar series, or other interactive learning material.
However, with the other two answer options, I do need to do some calculations before I can assess the quality of the lead.
Therefore, before I ask another question, I need to set up a variable to capture the value of the score. You can easily do that using the “Set a Variable” block:
- From your last block, draw a green arrow and select the “Set a Variable” option from the “Logic” section of the menu;
- Create the variable under which you want to store the lead score (e.g., @lead_score)
- Set its value to 0

Only then are you ready to ask your first scoring question.
To calculate the score for each of the answers, draw an arrow from each button option and, once again, select the “Set a Variable” block. Only this time, instead of just setting the value, you will perform a calculation:

- Set your variable to modify to @lead_score;
- Activate the “Perform a calculation” option;
- Sum the @lead_score with the numeric value of the answer in your scoring system.
To continue the scoring, repeat the process after each question. The value of the @lead_score variable will grow with each calculation.

8. Set Up Conditions to Optimize & Personalize the Flow
After you have successfully scored your leads, you can use the score to personalize the journey of your prospect in real time.
One of the easiest ways to do that is using the “Conditional logic” block (the same one we used in email validation).
Based on your scoring system, play around with the score value and set each segment of your leads on a different route. This, if you ask me, is the true beauty of a lead qualification bot. It helps you pick out and cater to the hottest leads while allowing you to also care for and provide value to the rest.
You can create a simple either/or scenario or set up a different journey for each segment using the more complex “and/or” conditions:

Depending on how detailed your scoring system is, you can segment your leads into as many flows or paths as possible in order to maximize your conversion rate.
Oh, and don’t forget to upload your scoring to the Google Spreadsheet!

9. Send Slack Notifications
If you don’t want your sales representatives to miss out on the hottest leads your bot has just qualified for, you can set up Slack notifications.
Just draw an arrow from the last block and select the “Slack” block in the “Integrations” section of the menu.
First, you will need to pair your company Slack account with Landbot. Once you do, though, you can easily choose to send notifications to specific channels or specific people. This comes in handy if you have a designated person for each type of lead.
Last but not least, you need to configure the notification message, which can be as simple as “You have a new lead” or more elaborate, including some real data using the variables.

10. Set up Bot-to-Human Handoff
Now, here is where things get interesting. If the bot captures and qualifies the lead as the “crème de la crème” of incoming leads, you can transfer it straight to a designated sales agent without losing any time.

Setting up a human takeover is no rocket science. Just select the “Human takeover” block in the “Inbox and builder tool” section of the menu, and, if you want, assign the takeover to a particular agent or agents. If you don’t, the bot will automatically pass the chat to an agent with the least conversations.
Your agents will be able to review and manage all incoming conversations in the Inbox section of the Landbot builder:

Here you can:
- See a summary of the lead’s information on the right side ;
- Review and respond to the chat in the middle section;
- Filter and search chats based on channel, the agent responsible, or the lead’s name, email, or phone number.
To prepare for an instance when no agent is available (perhaps because the lead comes in at 1 am from the other side of the world), draw an arrow from the pink output of the Human Takeover block and prepare an alternative scenario… e.g., the possibility to book a meeting with Calendly.

11. Recreate The Flow in the Second Language
Remember how we split our flow into English vs Español?
Well, now that you defined the flow in one language, all you need to do is copy it and translate it. No need to reconfigure everything from scratch!
With Landbot’s AI Agent
Landbot’s AI Agent allows you to build a lead qualification chatbot in just a few clicks.
The process is the same as building a lead generation bot since, without leads generated, there wouldn’t be any leads to qualify.
You just need to follow the tutorial linked above, and in the "Save User Answers" section, you can add the Custom Information that will allow you to better qualify your leads:
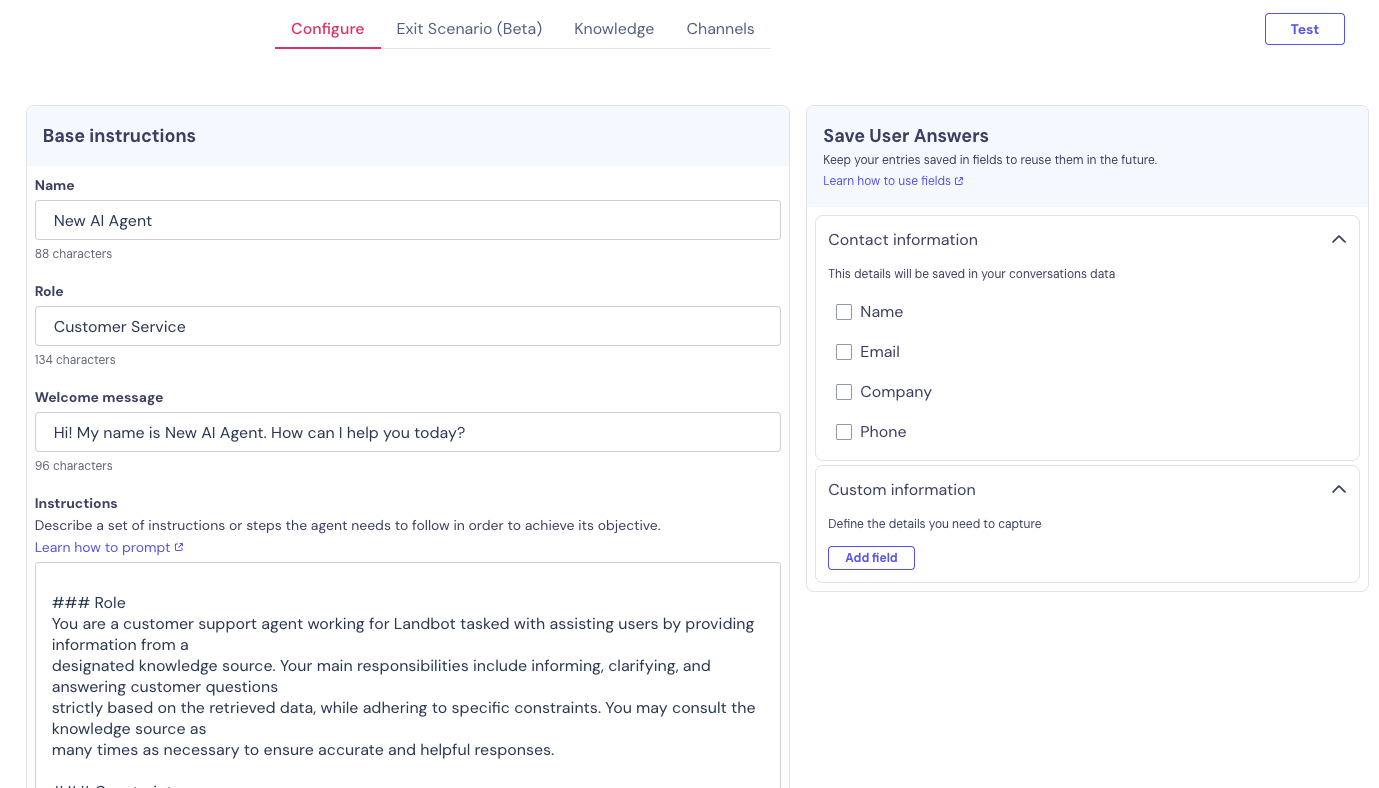
You can ask them for the budget they have for your product/service solutions, their authority at their company, for example, if they are in a decision-making position or not, and anything else you think is relevant for your lead qualification.
In the "Instructions" section, you can provide more information and add a prompt with extra instructions on how your AI Assistant should act, among other things. In this case, you can instruct it to act as a lead qualifying bot and give it context on what, for your business, is considered a qualified lead.
Advantages of Using a Lead Qualification Chatbot
Landing pages and online forms are often seen as easy-to-implement lead capture channels, but they do present several limitations when it comes to generating qualified leads.
Chatbots, on the other hand, combine the interactivity of human conversation with automation and omnichannel reach. A single chatbot flow can run on your website, Facebook page, or WhatsApp account, qualifying leads consistently across every channel.
Here’s what makes them powerful:
- Personalized interactions: Chatbots tailor conversations in real time, collecting better data while creating a more human-like, engaging experience.
- Instant reaction to lead scores: High-quality leads can be immediately routed to a sales rep or offered a call/demo, while others can be nurtured with relevant content or free trials.
- CRM integration: Chatbots feed lead data directly into your CRM, ensuring your sales team can act fast and focus only on qualified opportunities.
- Channel flexibility: With integrations across WhatsApp, Messenger, or your website, chatbots meet leads wherever they are.
Use Cases for Lead Qualification Chatbots
Lead qualification chatbots can be adapted to fit virtually any industry. Here are a few examples:
- SaaS: Qualify trial users by assessing company size, role, and use case, then route enterprise leads directly to an account executive.
- Real Estate: Capture buyers or renters through property listings and pre-qualify them based on budget, location, and purchase timeline.
- B2B Services: Use chatbots to identify decision-makers, budget range, and project urgency before scheduling discovery calls.
- Education: Qualify prospective students by course interest, location, and start date to connect them with the right program advisor.
- E-commerce: Assess shopper intent, whether browsing, comparing, or ready to buy, and guide high-intent leads to checkout or live agents.
The Future of Lead Qualification Chatbots
As AI continues to evolve, chatbots are becoming a central part of the sales funnel. Advanced AI agents can now detect intent, analyze tone, and adapt qualification logic dynamically.
In the near future, expect chatbots to not only score leads but also predict deal potential using historical CRM data. With integrations across multiple channels and improved contextual understanding, AI-powered lead qualification bots will soon become indispensable for high-velocity sales teams that rely on real-time insights to boost revenue.
What’s Next?
Well, this is it.
Your guide on how to build a lead qualification chatbot, with and without AI. I bet you thought it would be much more difficult than this!
Using a lead qualification bot will help you manage and process all your website or WhatsApp visitors interested in your product or service, making the life of your sales and marketing teams significantly easier.
Now it’s your time to try and use a lead qualification bot. The results may astound you!
FAQs About Lead Qualification Chatbots
What is the fastest way to build a lead qualification chatbot that actually improves conversion rates?
Using a no-code builder like Landbot lets you create and launch a fully functional chatbot in minutes. You can plug in your qualification logic, connect to your CRM, and go live quickly, no coding needed.
How can a lead qualification chatbot replace traditional web forms or SDR outreach?
Instead of static questions, chatbots engage visitors through personalized conversations, gathering richer data and qualifying leads in real time, reducing the need for repetitive manual follow-ups.
Which lead scoring frameworks work best with a chatbot (e.g. BANT, MEDDIC)?
BANT and MEDDIC remain strong options. Chatbots can easily be programmed to collect each data point these frameworks require (budget, authority, need, etc.) and assign a score automatically.
What tools do I need to build a revenue-focused lead qualification chatbot?
At minimum: a chatbot builder (like Landbot), your CRM, and optionally Google Sheets or Slack integrations for data management and notifications.
How can I integrate a chatbot with my CRM to route qualified leads to sales faster?
You can use native integrations (e.g., HubSpot, Salesforce) or webhooks to automatically push qualified leads and scores into your CRM in real time.
What kind of lead data can a chatbot collect that forms can’t?
Chatbots can collect contextual and behavioral data, such as intent, urgency, objections, and preferences, by analyzing how users respond and engage throughout the conversation.
Can I use chatbots to qualify leads across multiple channels like WhatsApp or Facebook?
Absolutely. Tools like Landbot allow you to deploy the same qualification logic across multiple messaging channels and manage all interactions from one dashboard.
How does using a chatbot for lead qualification impact my sales pipeline?
It accelerates your funnel by reducing response time, improving lead data accuracy, and allowing your sales team to focus on prospects most likely to convert.
.avif)


.avif)
.avif)
%20(1).png)
.avif)