.svg)
Please note that 'Variables' are now called 'Fields' in Landbot's platform.
Intro to WhatsApp Message Templates
If you're new to using WhatsApp for business communications, you might not be familiar with one of its core features: WhatsApp Message Templates. These are essentially pre-approved messages that businesses use to communicate with clients efficiently and consistently. Before you can send out certain types of messages to your customers, Meta requires that these templates are reviewed and approved to ensure they meet quality standards and are not spammy. This process helps maintain a professional tone in your communications, ensuring that your messages contribute positively to the user experience, which in turn benefits your business.
For business owners looking to engage clients with WhatsApp bots, these templates are invaluable. They streamline the interaction process by allowing you to have ready the responses for frequently asked questions or regular updates, like appointment reminders or shipping confirmations. This not only saves time but also ensures that all communications are clear, consistent, and compliant with WhatsApp's policies. By integrating Message Templates into your strategy, you can enhance your client interactions, making them more effective and aligned with your business goals while adhering to the necessary regulations.
Meet our ‘Send a Message Template’ block for WhatsApp Business Chatbots
In an era where personalized and seamless communication is key to business success, integrating advanced functionalities into your bot can significantly enhance customer engagement. The ability to add Message Templates directly from the builder, combine call-to-action (CTA) and quick reply buttons, and manage intricate customer journeys within a single flow, empowers businesses to create richer, more interactive conversations.
This feature, the ‘Send a Message Template’ block, allows companies to deliver tailored messages, simplify interactions, and automate essential processes, all while improving customer satisfaction and boosting engagement. By making these tools accessible to users of all skill levels, businesses can streamline operations and drive higher conversion rates without the need for technical expertise.
Now, let’s take it a step further and build a bot together, step by step. We’ll guide you through the process of creating a dynamic and personalized WhatsApp bot that leverages these powerful features to elevate your customer experience.
How to build a WhatsApp bot using the ‘Send a Message template’ block - Step by step with a real use case
We'll go step-by-step to better understand how to use this feature through a real use case typical among our clients.
A car dealership has integrated a WhatsApp bot to streamline customer interactions. The dealership's website features a QR code that customers can scan to initiate conversations with various departments.
Check out the real example and interact with the bot to experience the user interface firsthand. And this is what that bot would look like behind the scenes:
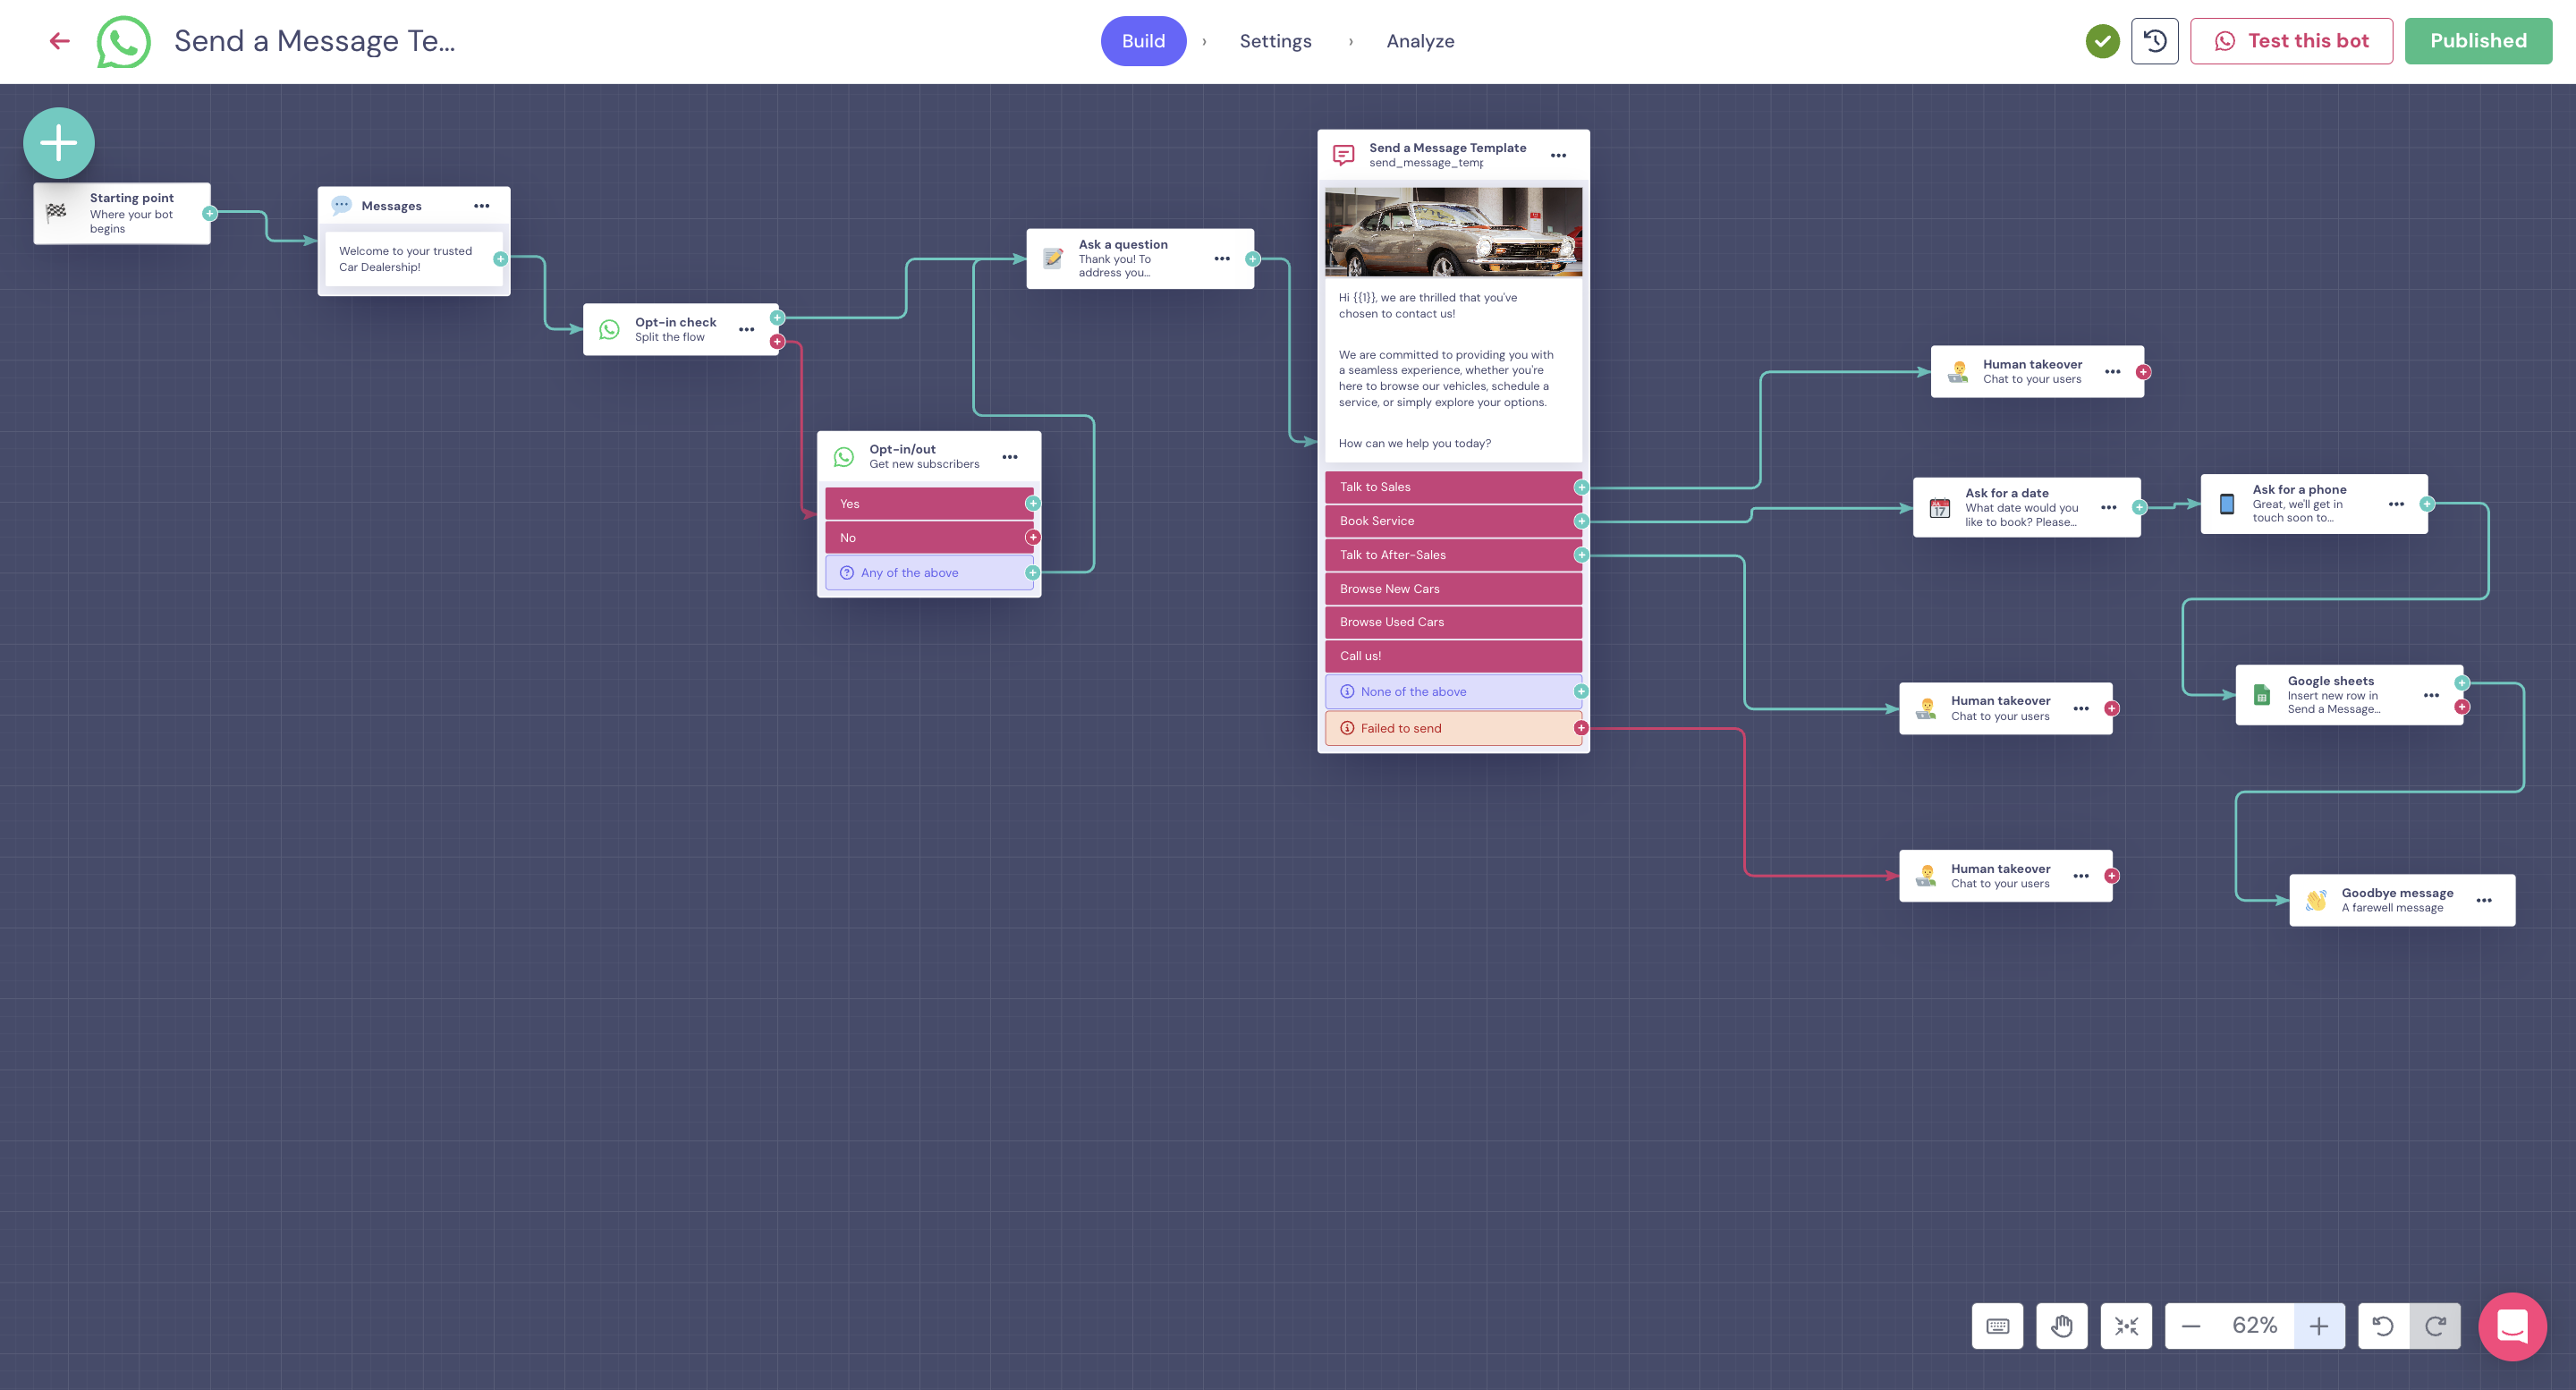
*At the end of this article, you will find a link to this bot as a template that you can edit, publish, and use in just a few minutes.
This WhatsApp bot includes everything needed to offer customers a personalized conversation tailored to their needs with a simple, easy, and quick-to-build flow.
It features a complete Message Template with diverse types of CTAs, dynamic links, quick reply buttons, and, of course, fields that contain important information to tailor each customer experience. All this information is then pushed to a CRM to update stored lead information based on the interactions.
But let's delve deeper and go step-by-step to understand how we've built this fully personalized conversational experience. In this case, we’ll cover all the services that a car dealership company offers.
Plan your WhatsApp bot’s conversational flow - Start building!
It is essential that you have a clear idea of how the flow would look like. You can do that by simply starting building the bot in the builder and adding notes for the missing pieces that you need to build aside, like Message Templates. Or you can just use any collaboration tool such as Miro to draw the flow and visually project it.
In our example, we'll start building the WhatsApp bot and pause when it's time to add the message template block. Then, to add the message template bot, we’ll do it from the 'Request a Template' section, to get it approved before we finish building the chatbot. So let’s get started:
1. Click on Build a chatbot and select WhatsApp bot > Start from scratch.
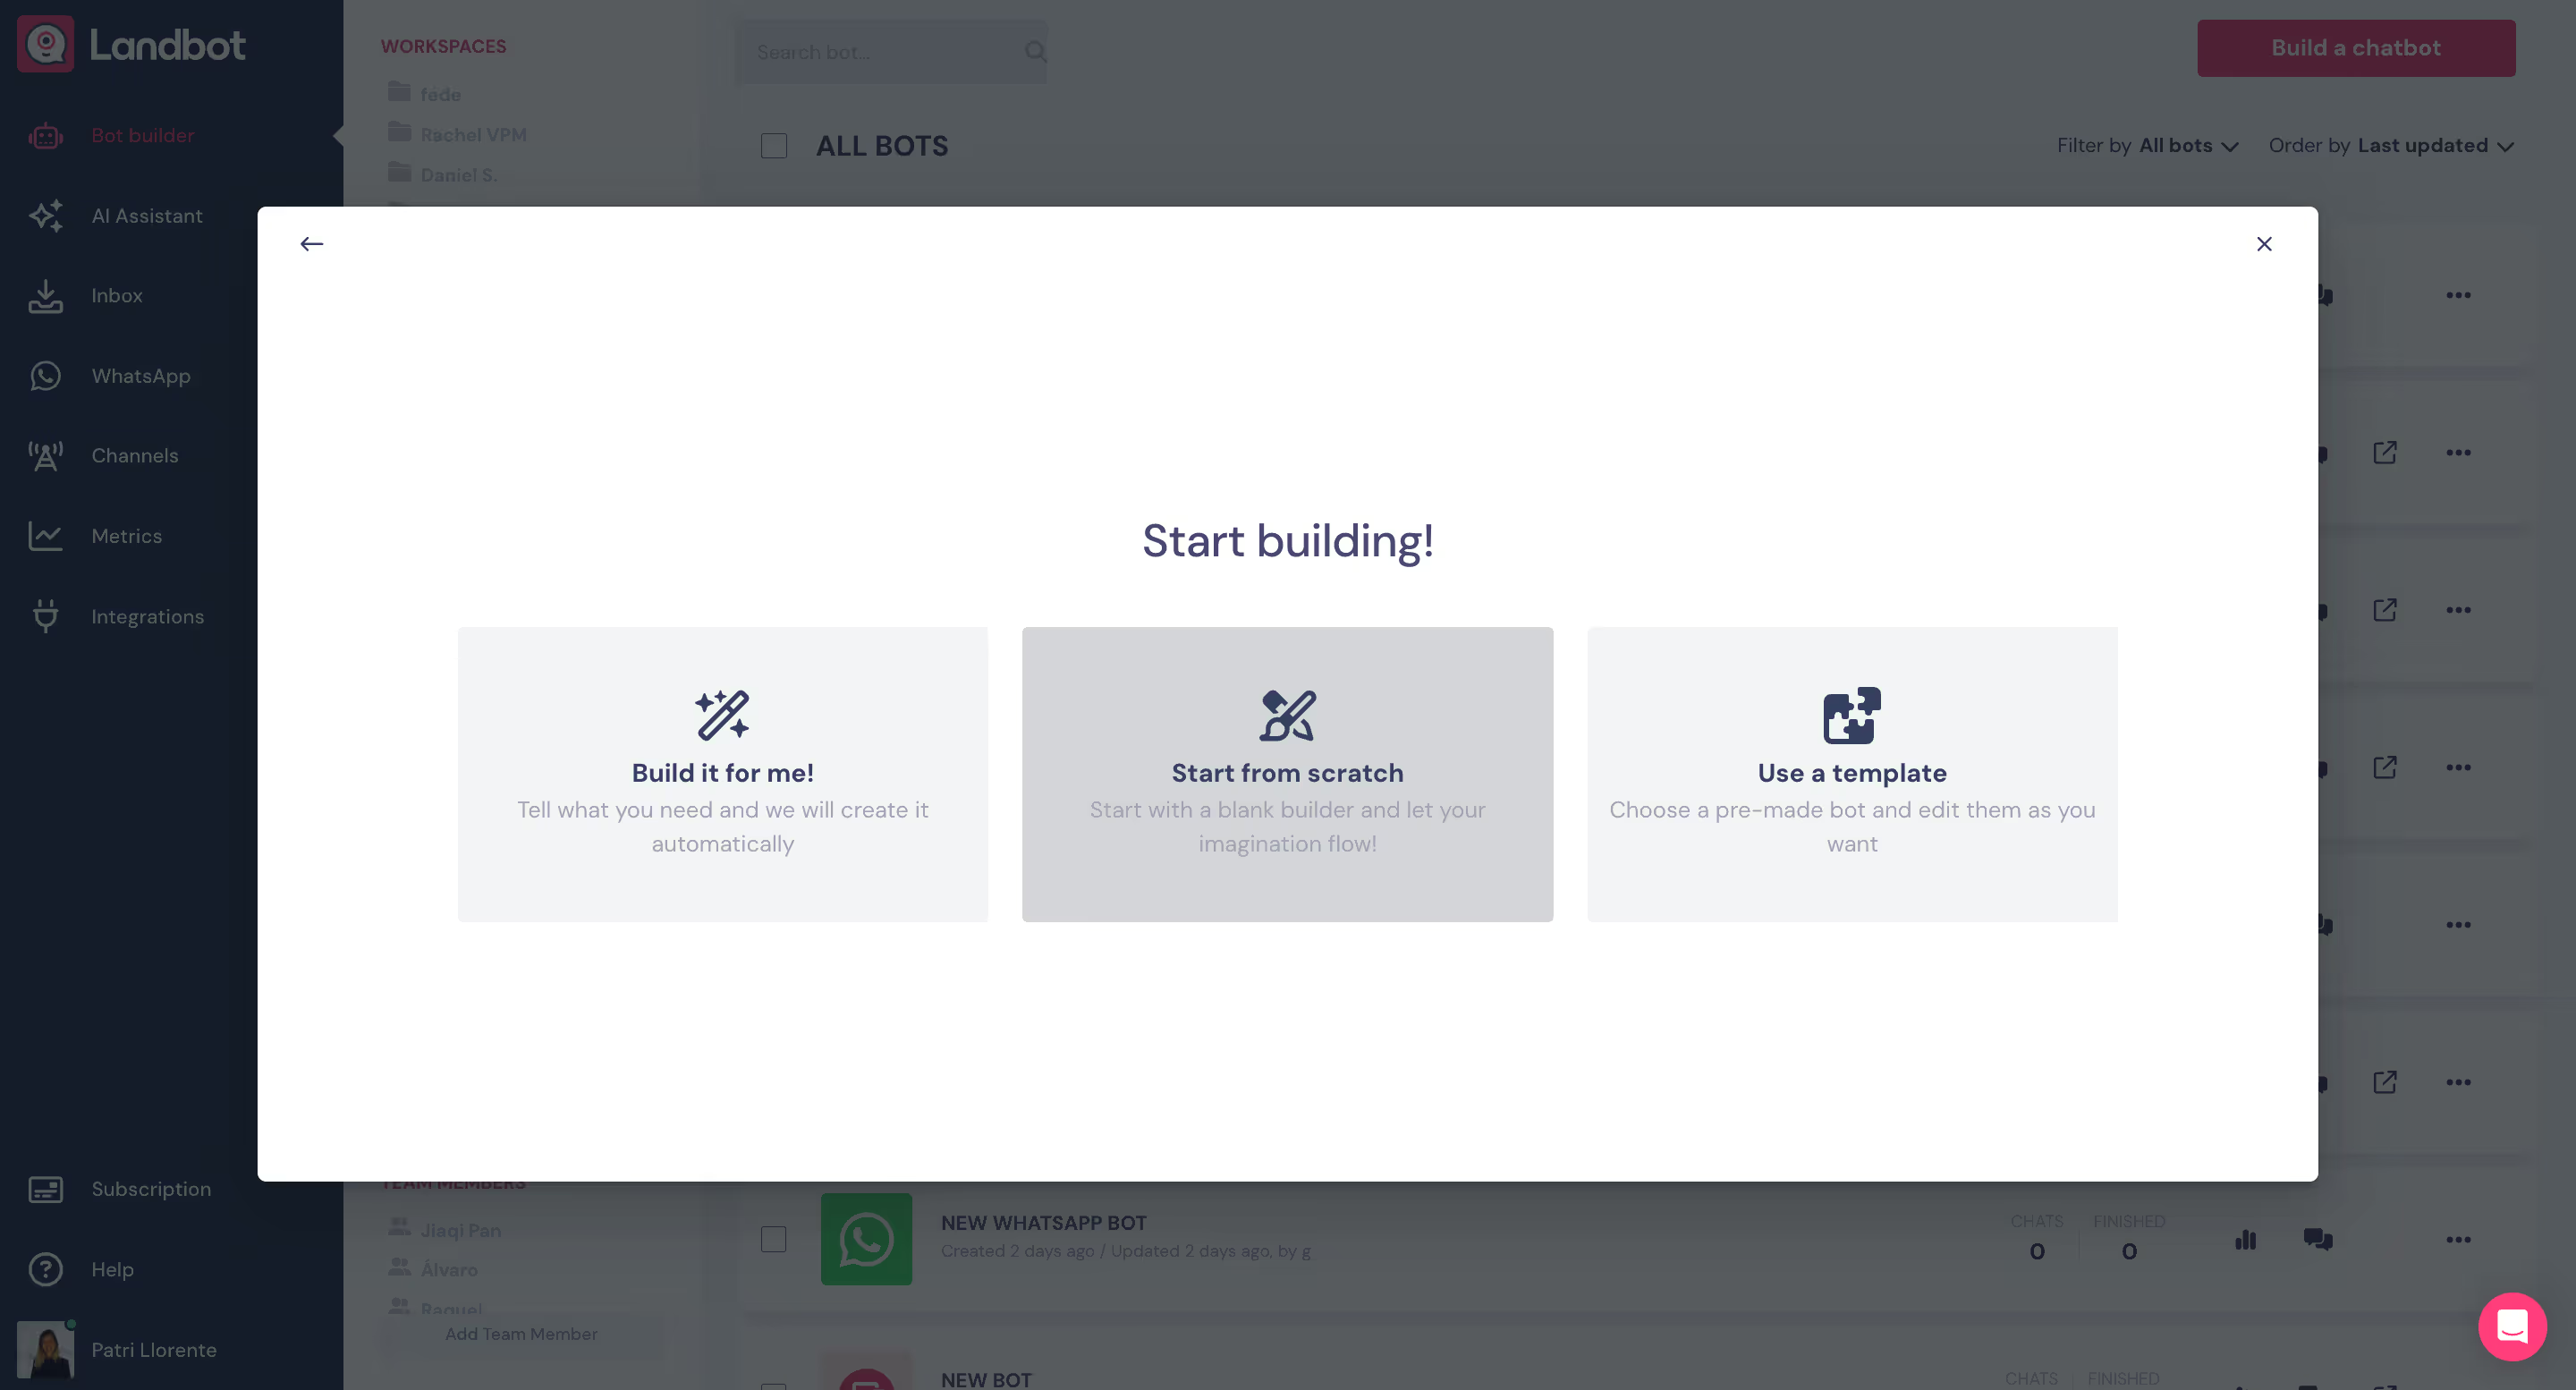
2. Add a message block to welcome users or showcase key brand messaging.
3. Next, we'll add the opt-in block. This ensures that clients understand that the conversation will happen on WhatsApp and they can confirm their consent to future contact through this channel. This one-time confirmation expands our client database and marketing reach. We can also include the opt-in check block to display the message only to those who haven't opted in yet.
4. Once we have their confirmation, we add an 'ask a question' block. In our example, we ask for the customer's name to personalize the conversation. You can customize the engagement as much as you like using fields (variables in the image below). In this case, we add the 'name' field so the client's response is saved and can be used later in the flow, including the Message Template.
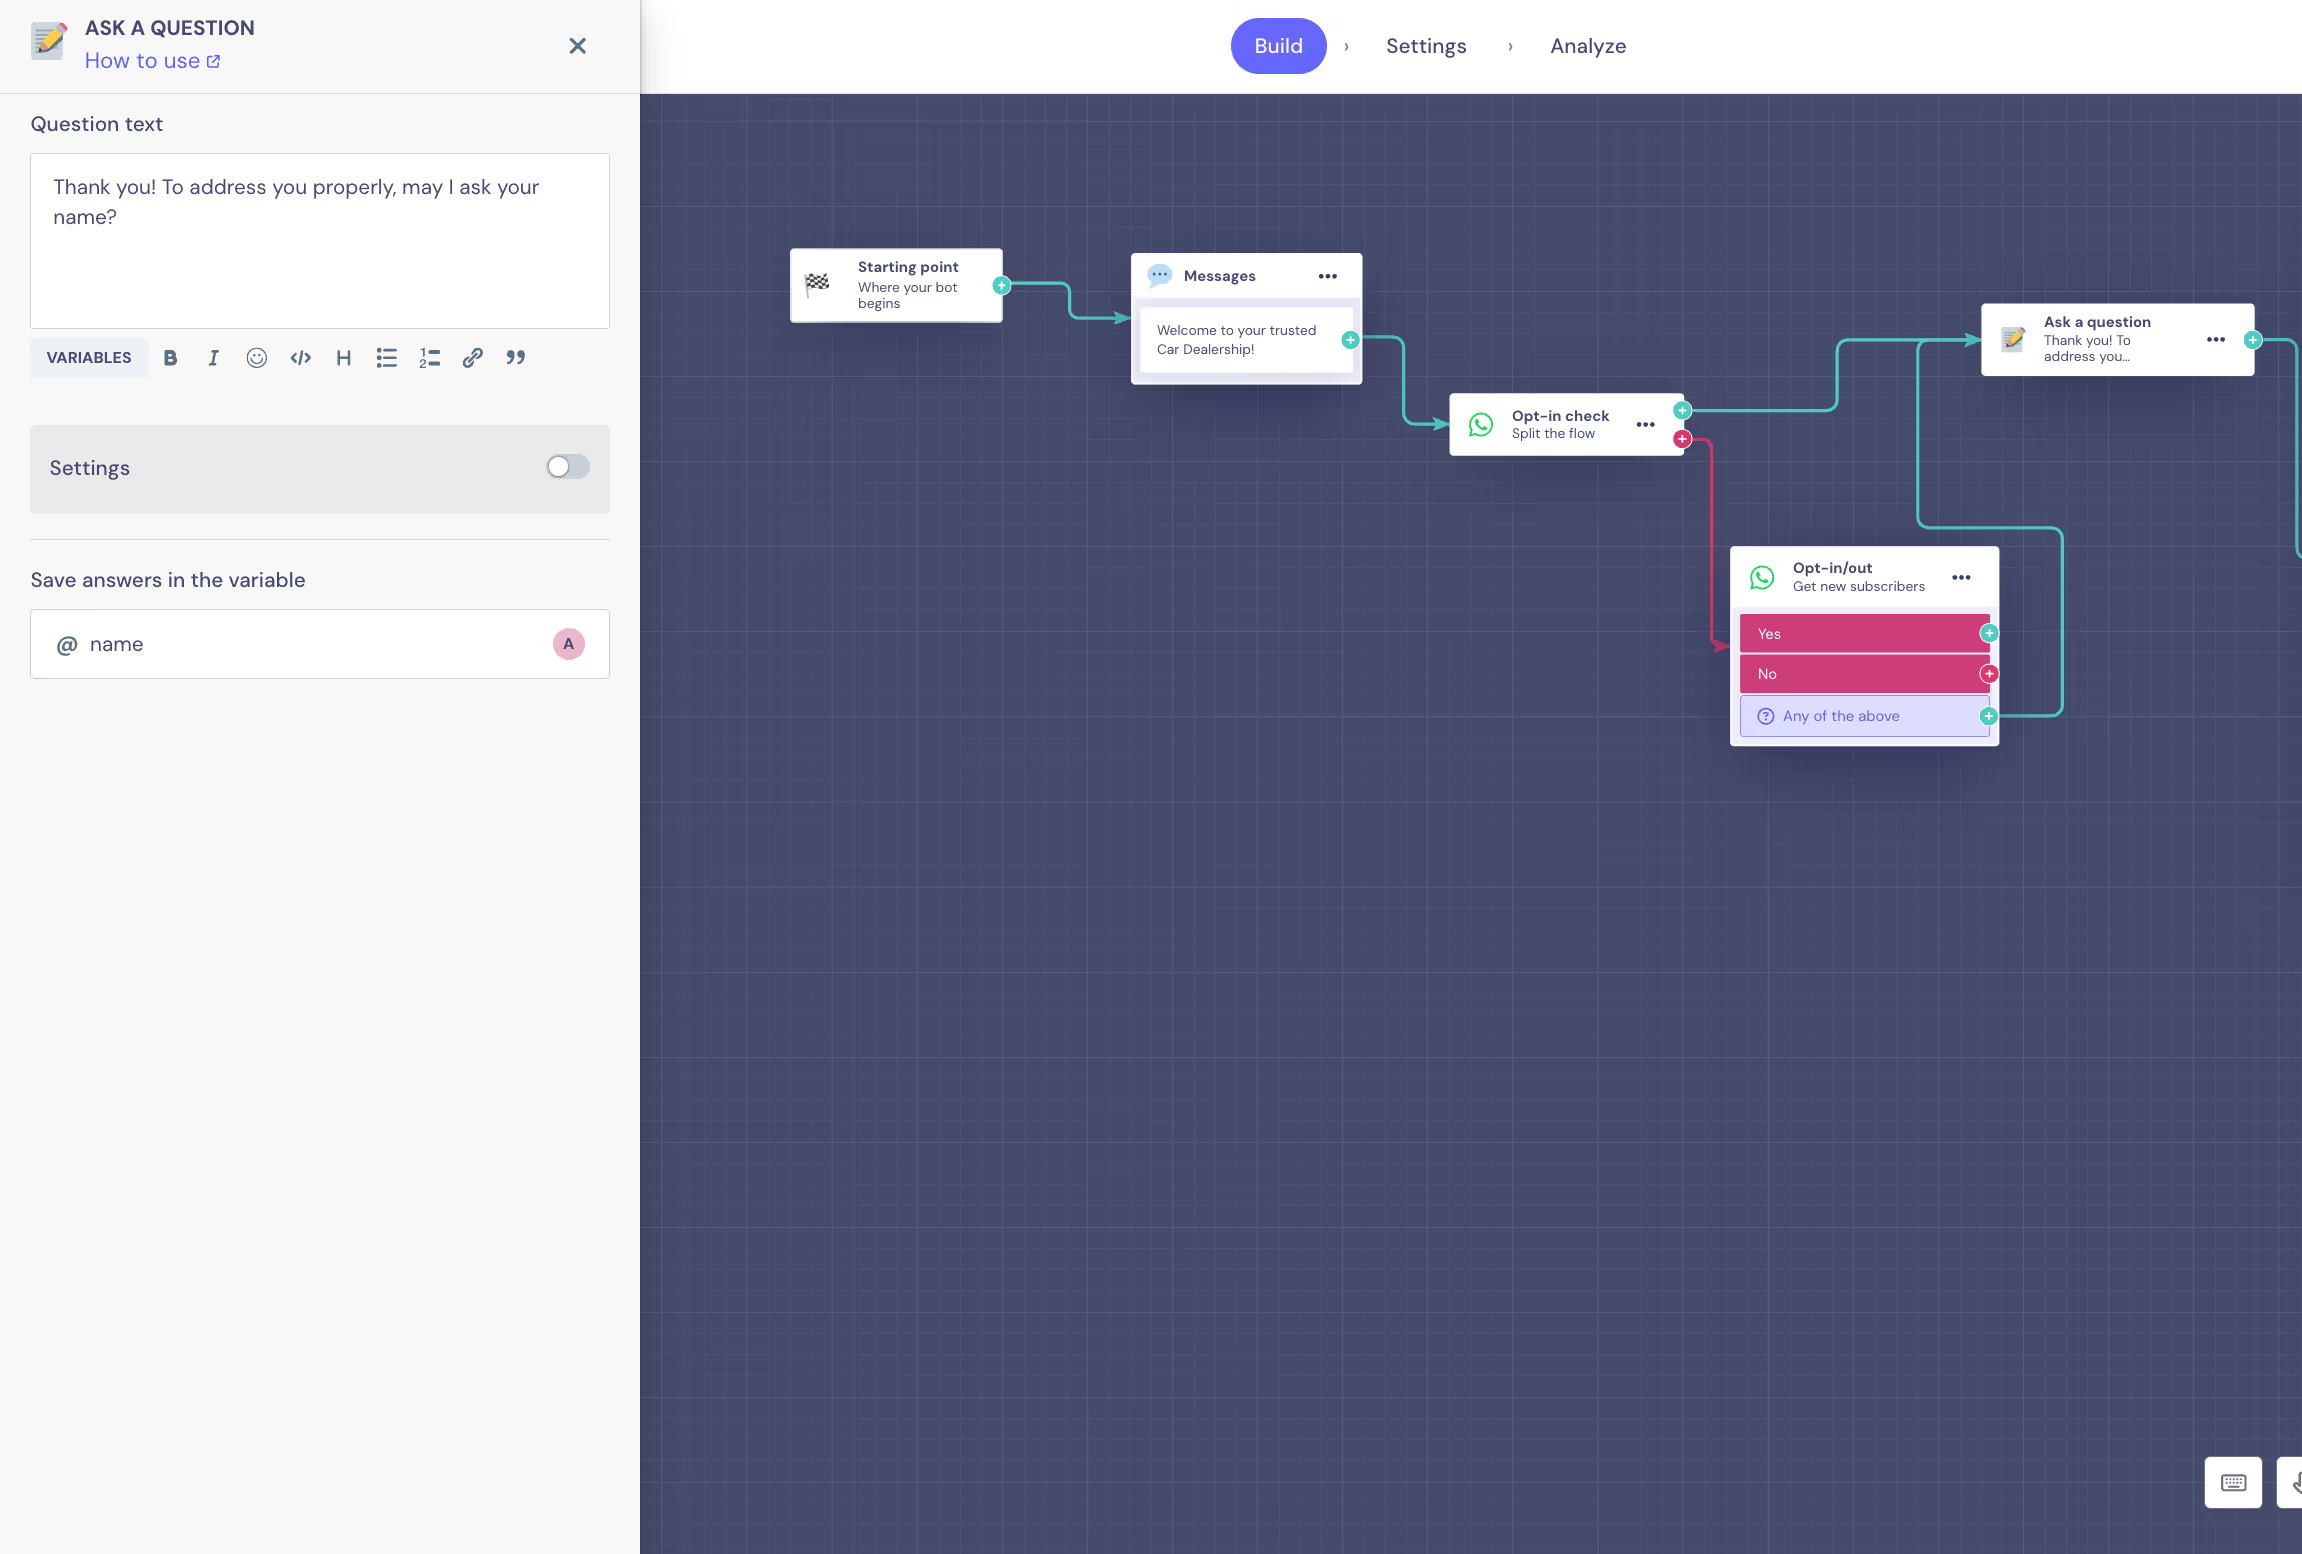
5. Now it's time to add the ‘Send a Message Template’ block. We need to request it first, so make sure all changes are saved by checking the green tick in the upper bar. Once you’ve double checked everything it’s saved, you can proceed!

Request a WhatsApp Message Template
1. Navigate to the WhatsApp tab, select the integrated phone number you wish to use for communications, and click on 'Message Templates'. From there, simply click on ‘Request Message Template’ to get started.
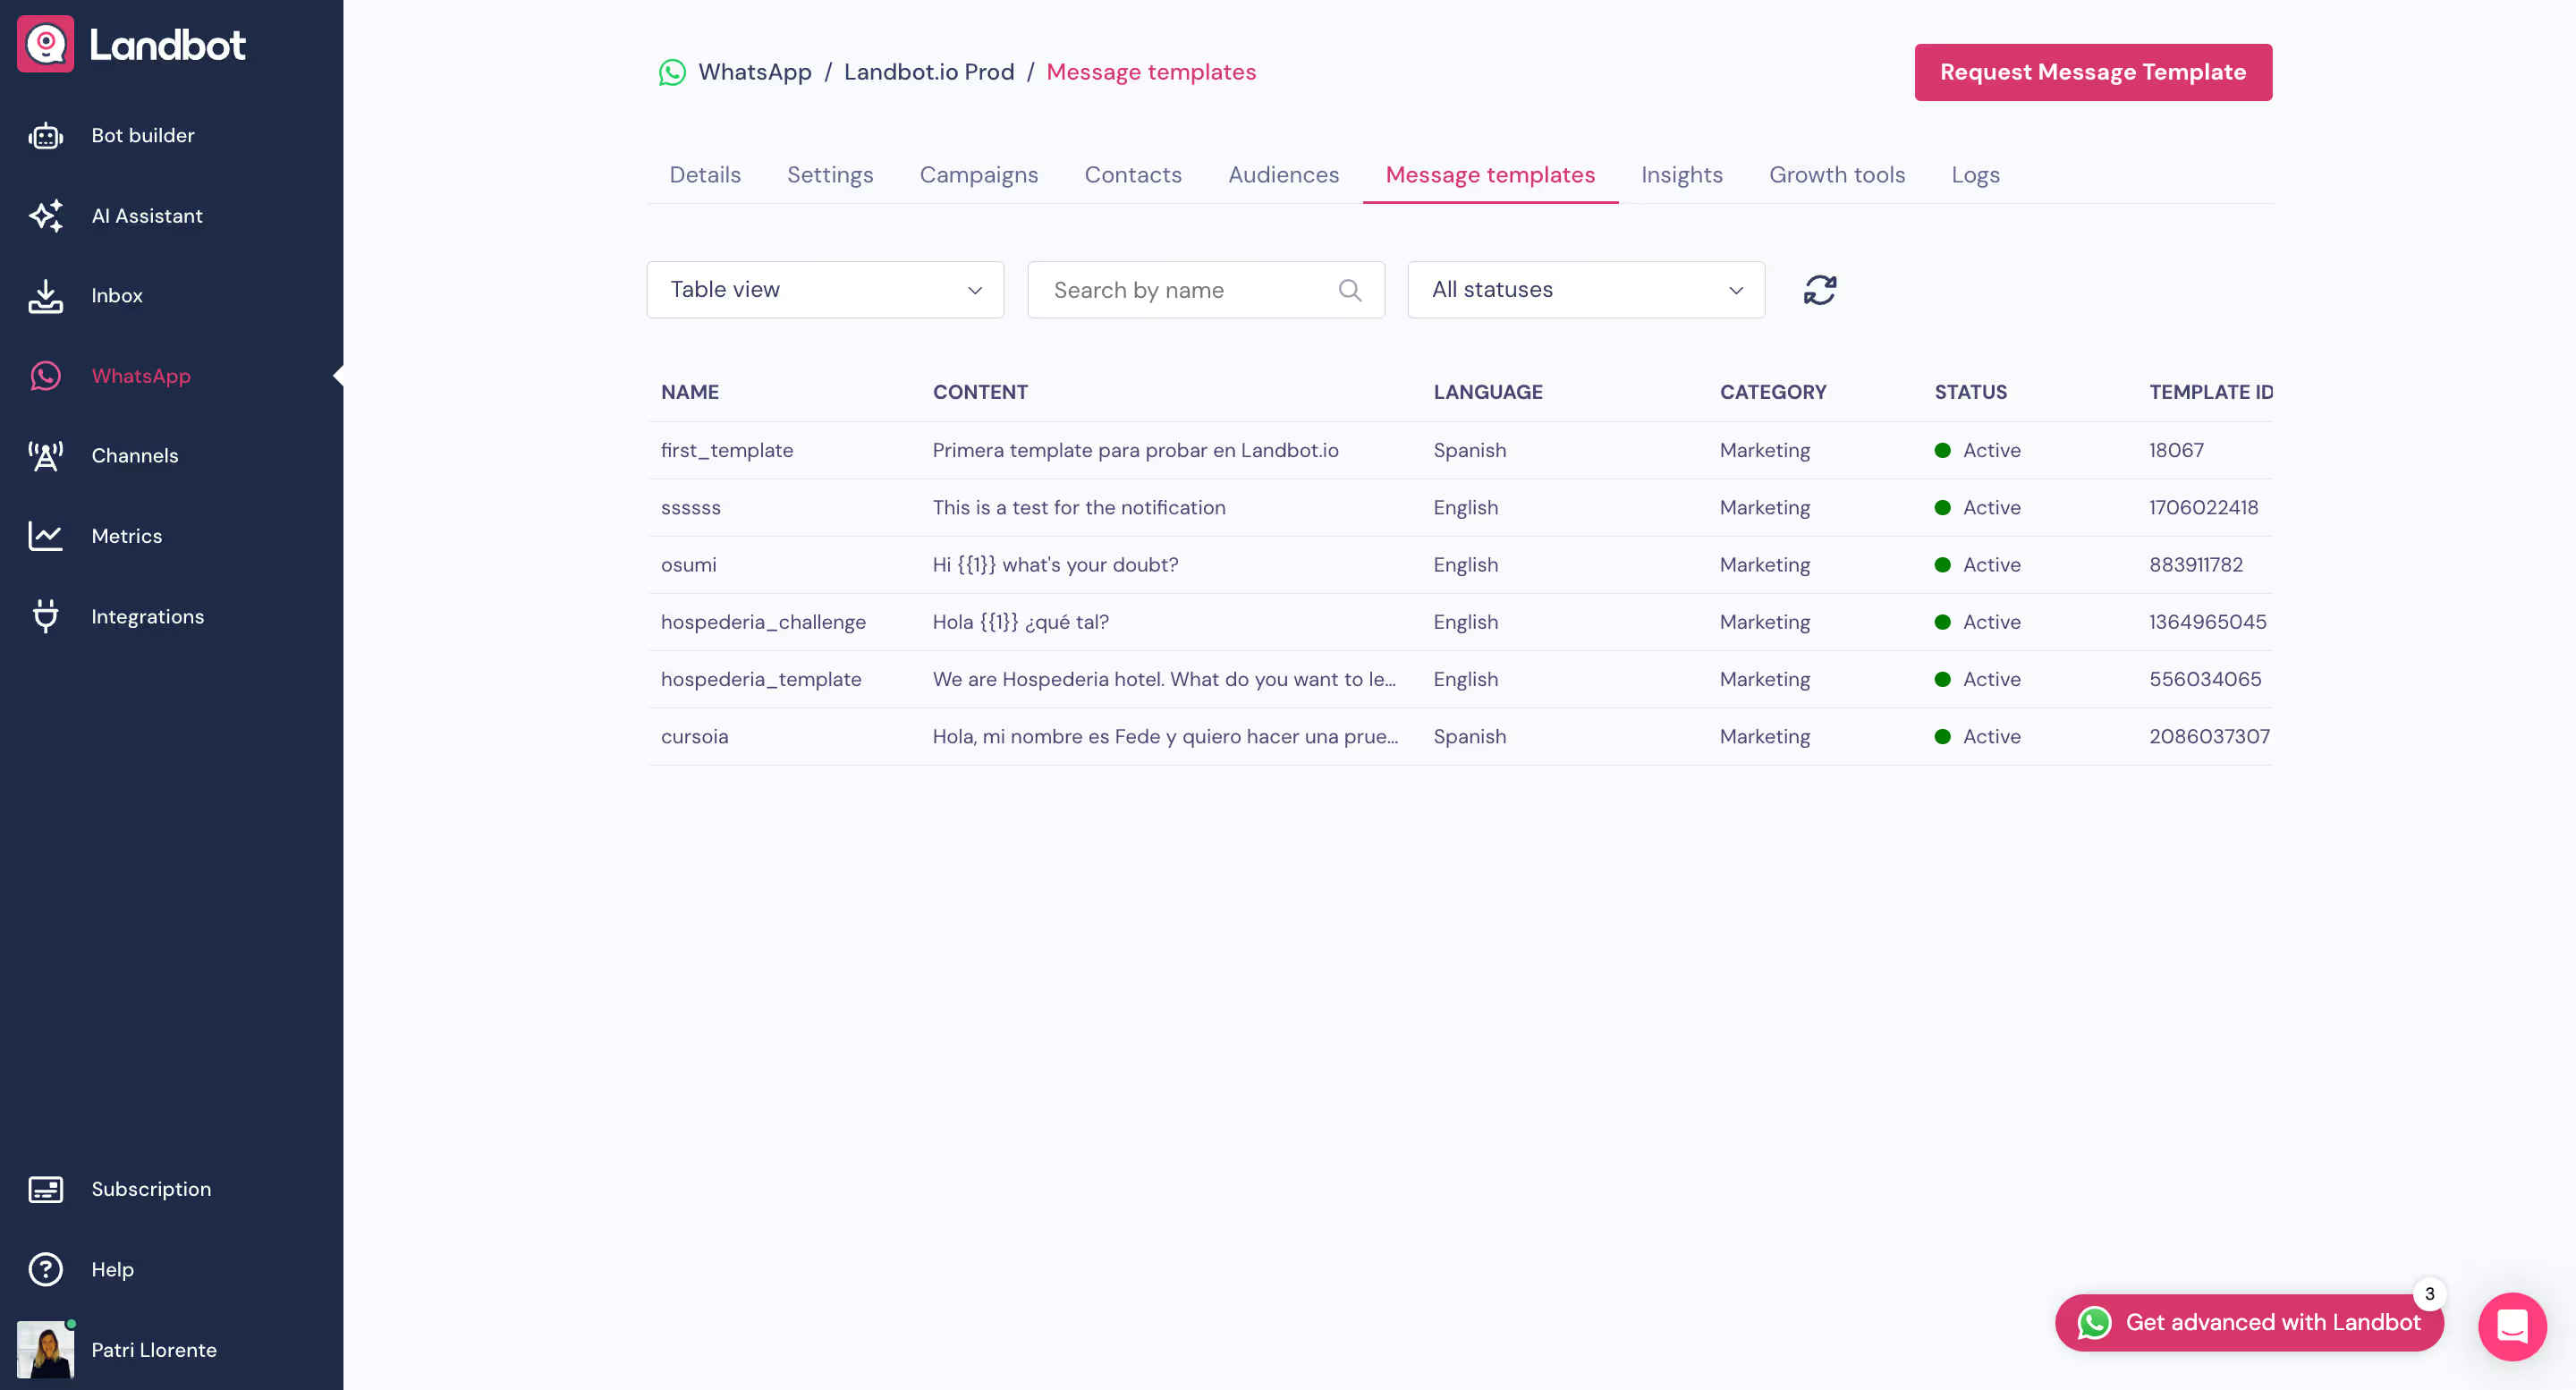
2. Now, just type the name of the Message Template. Note that it will only allow lowercase characters, numbers, and underscores, with no spaces or other symbols.
3. Select the Category. The category you choose will depend on the content of the template. You can check all available categories, and their functions on Meta’s website. As shown in the link, Meta defines each category clearly. If you choose the wrong one, don’t worry—Meta will reject it, and you can simply retry with the correct one.
4. In this case, according to Meta, the appropriate category for our content is the Marketing category. Keep in mind that even if the customer initiates the conversation, Meta initially categorizes any Message Template that isn’t strictly service-related as marketing, adjusting the conversation charge later based on their specified criteria. Remember you can always read more about how Meta charges conversations on their website.
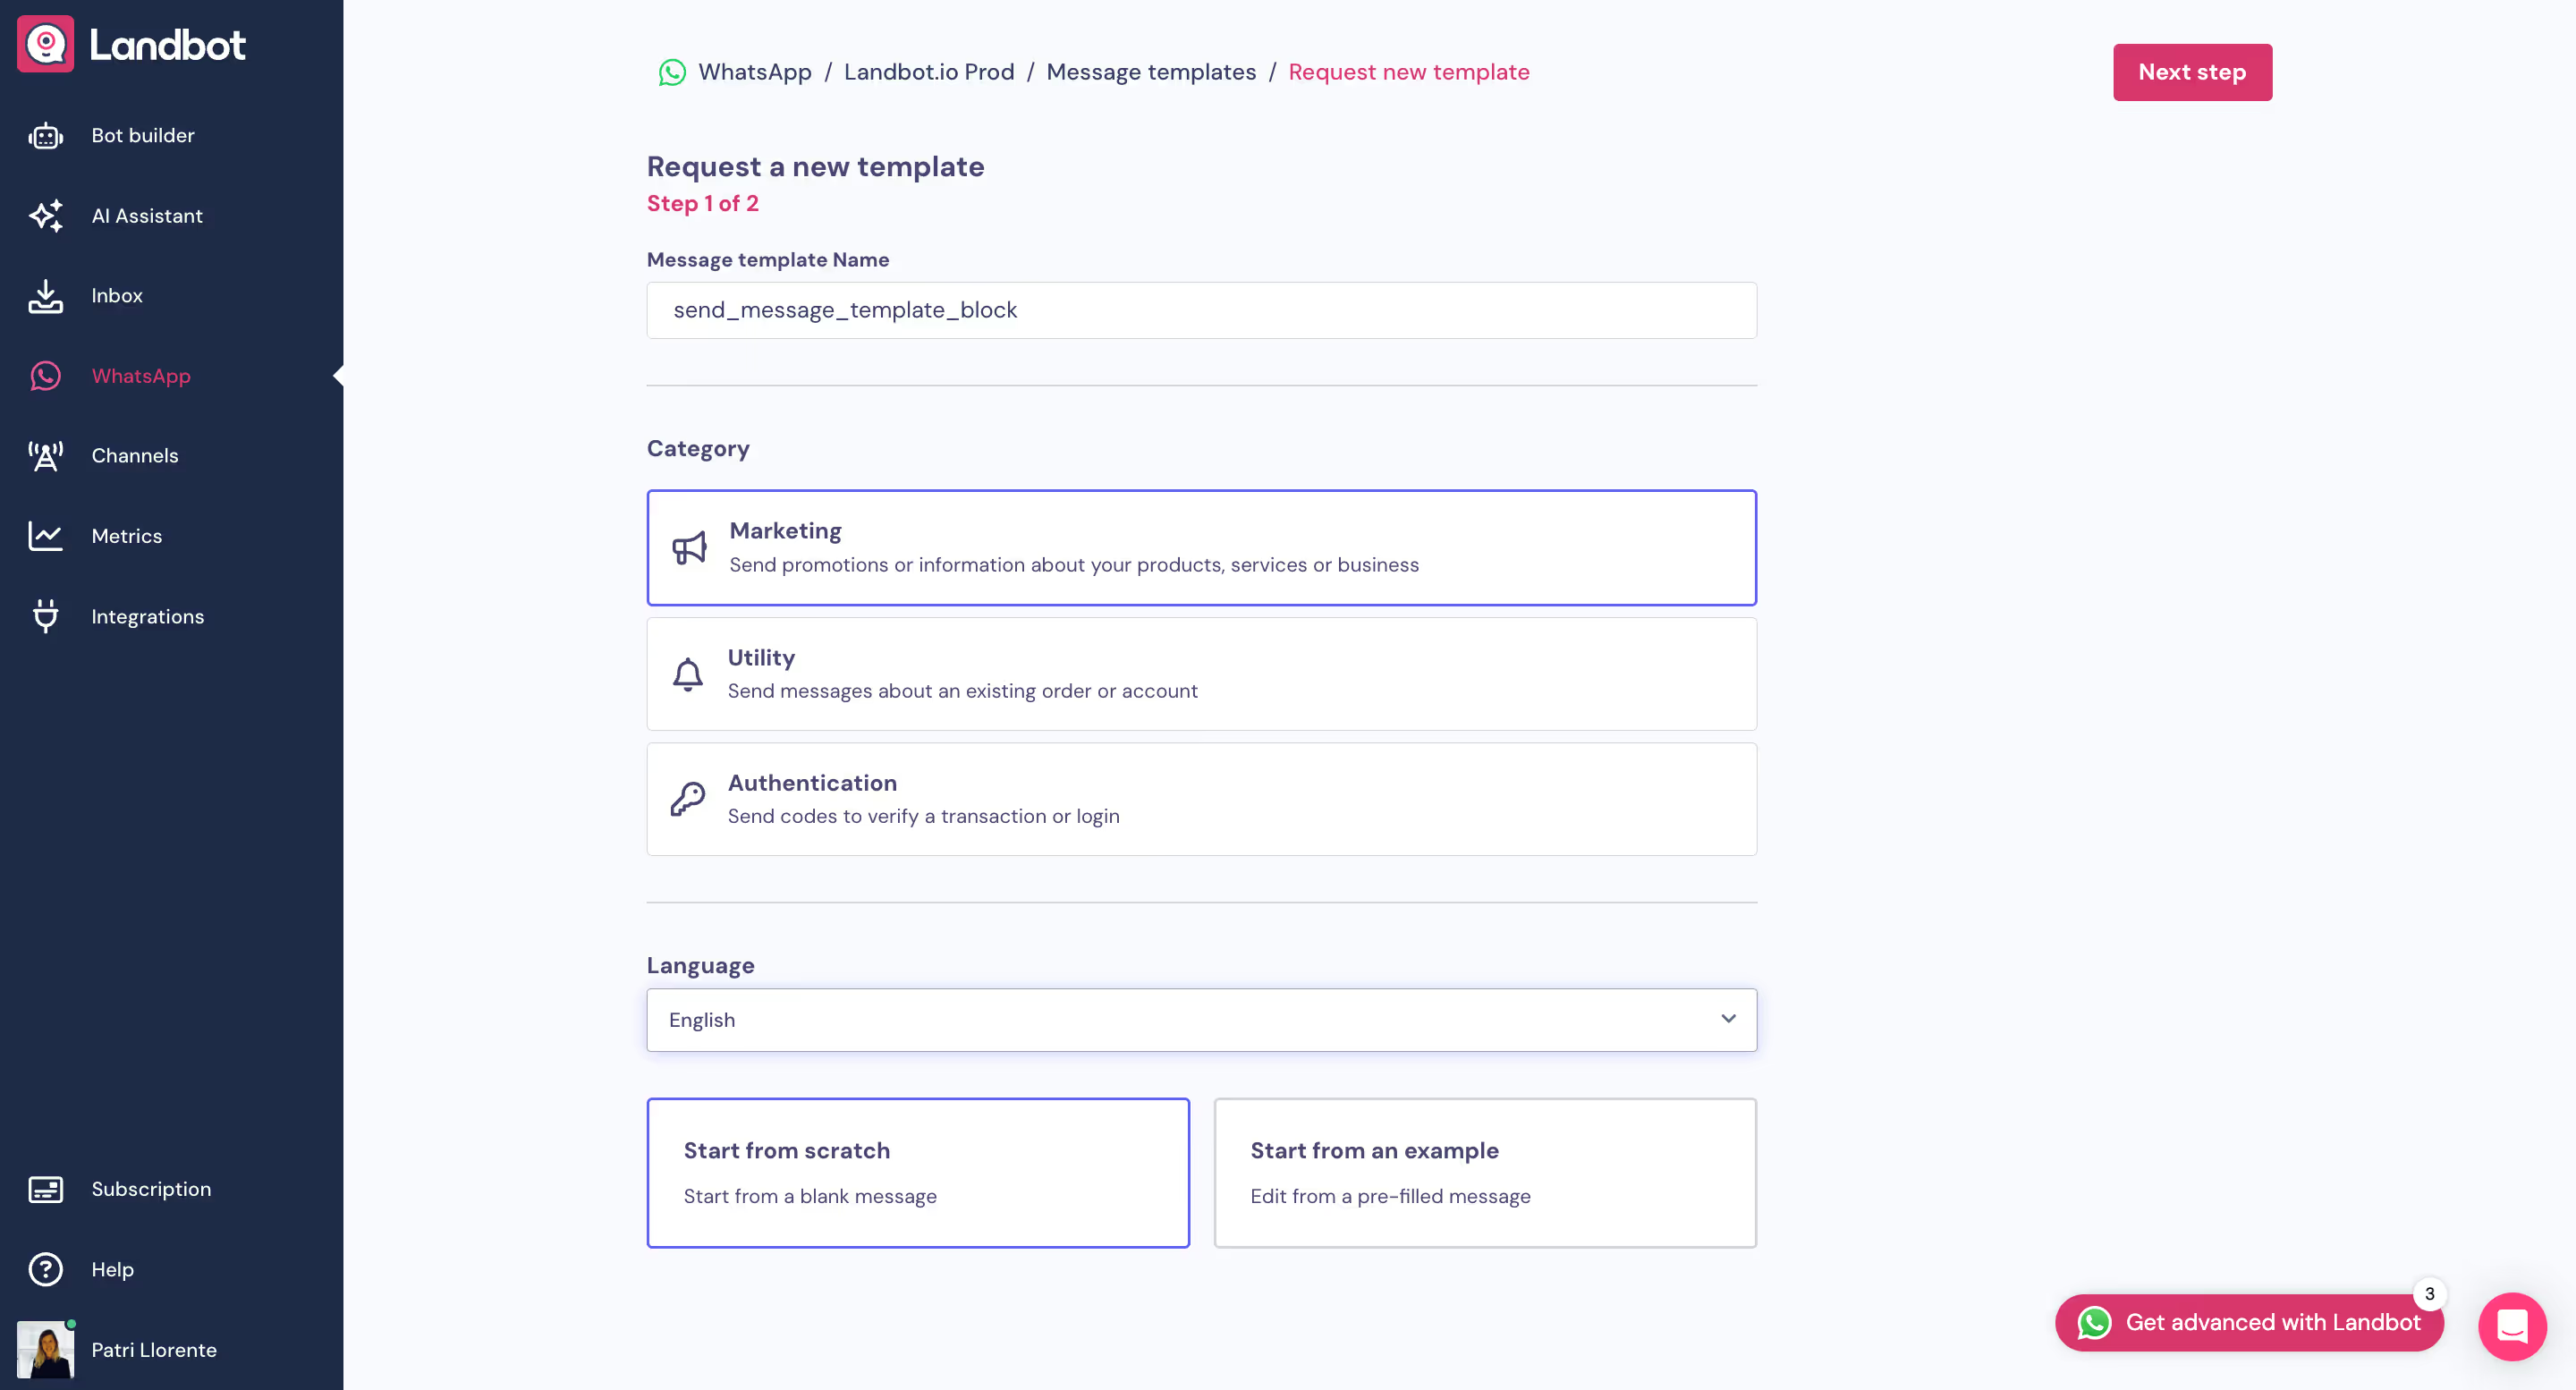
5. Adjust the language and choose the option that works best for you—either start from scratch or use an editable example.
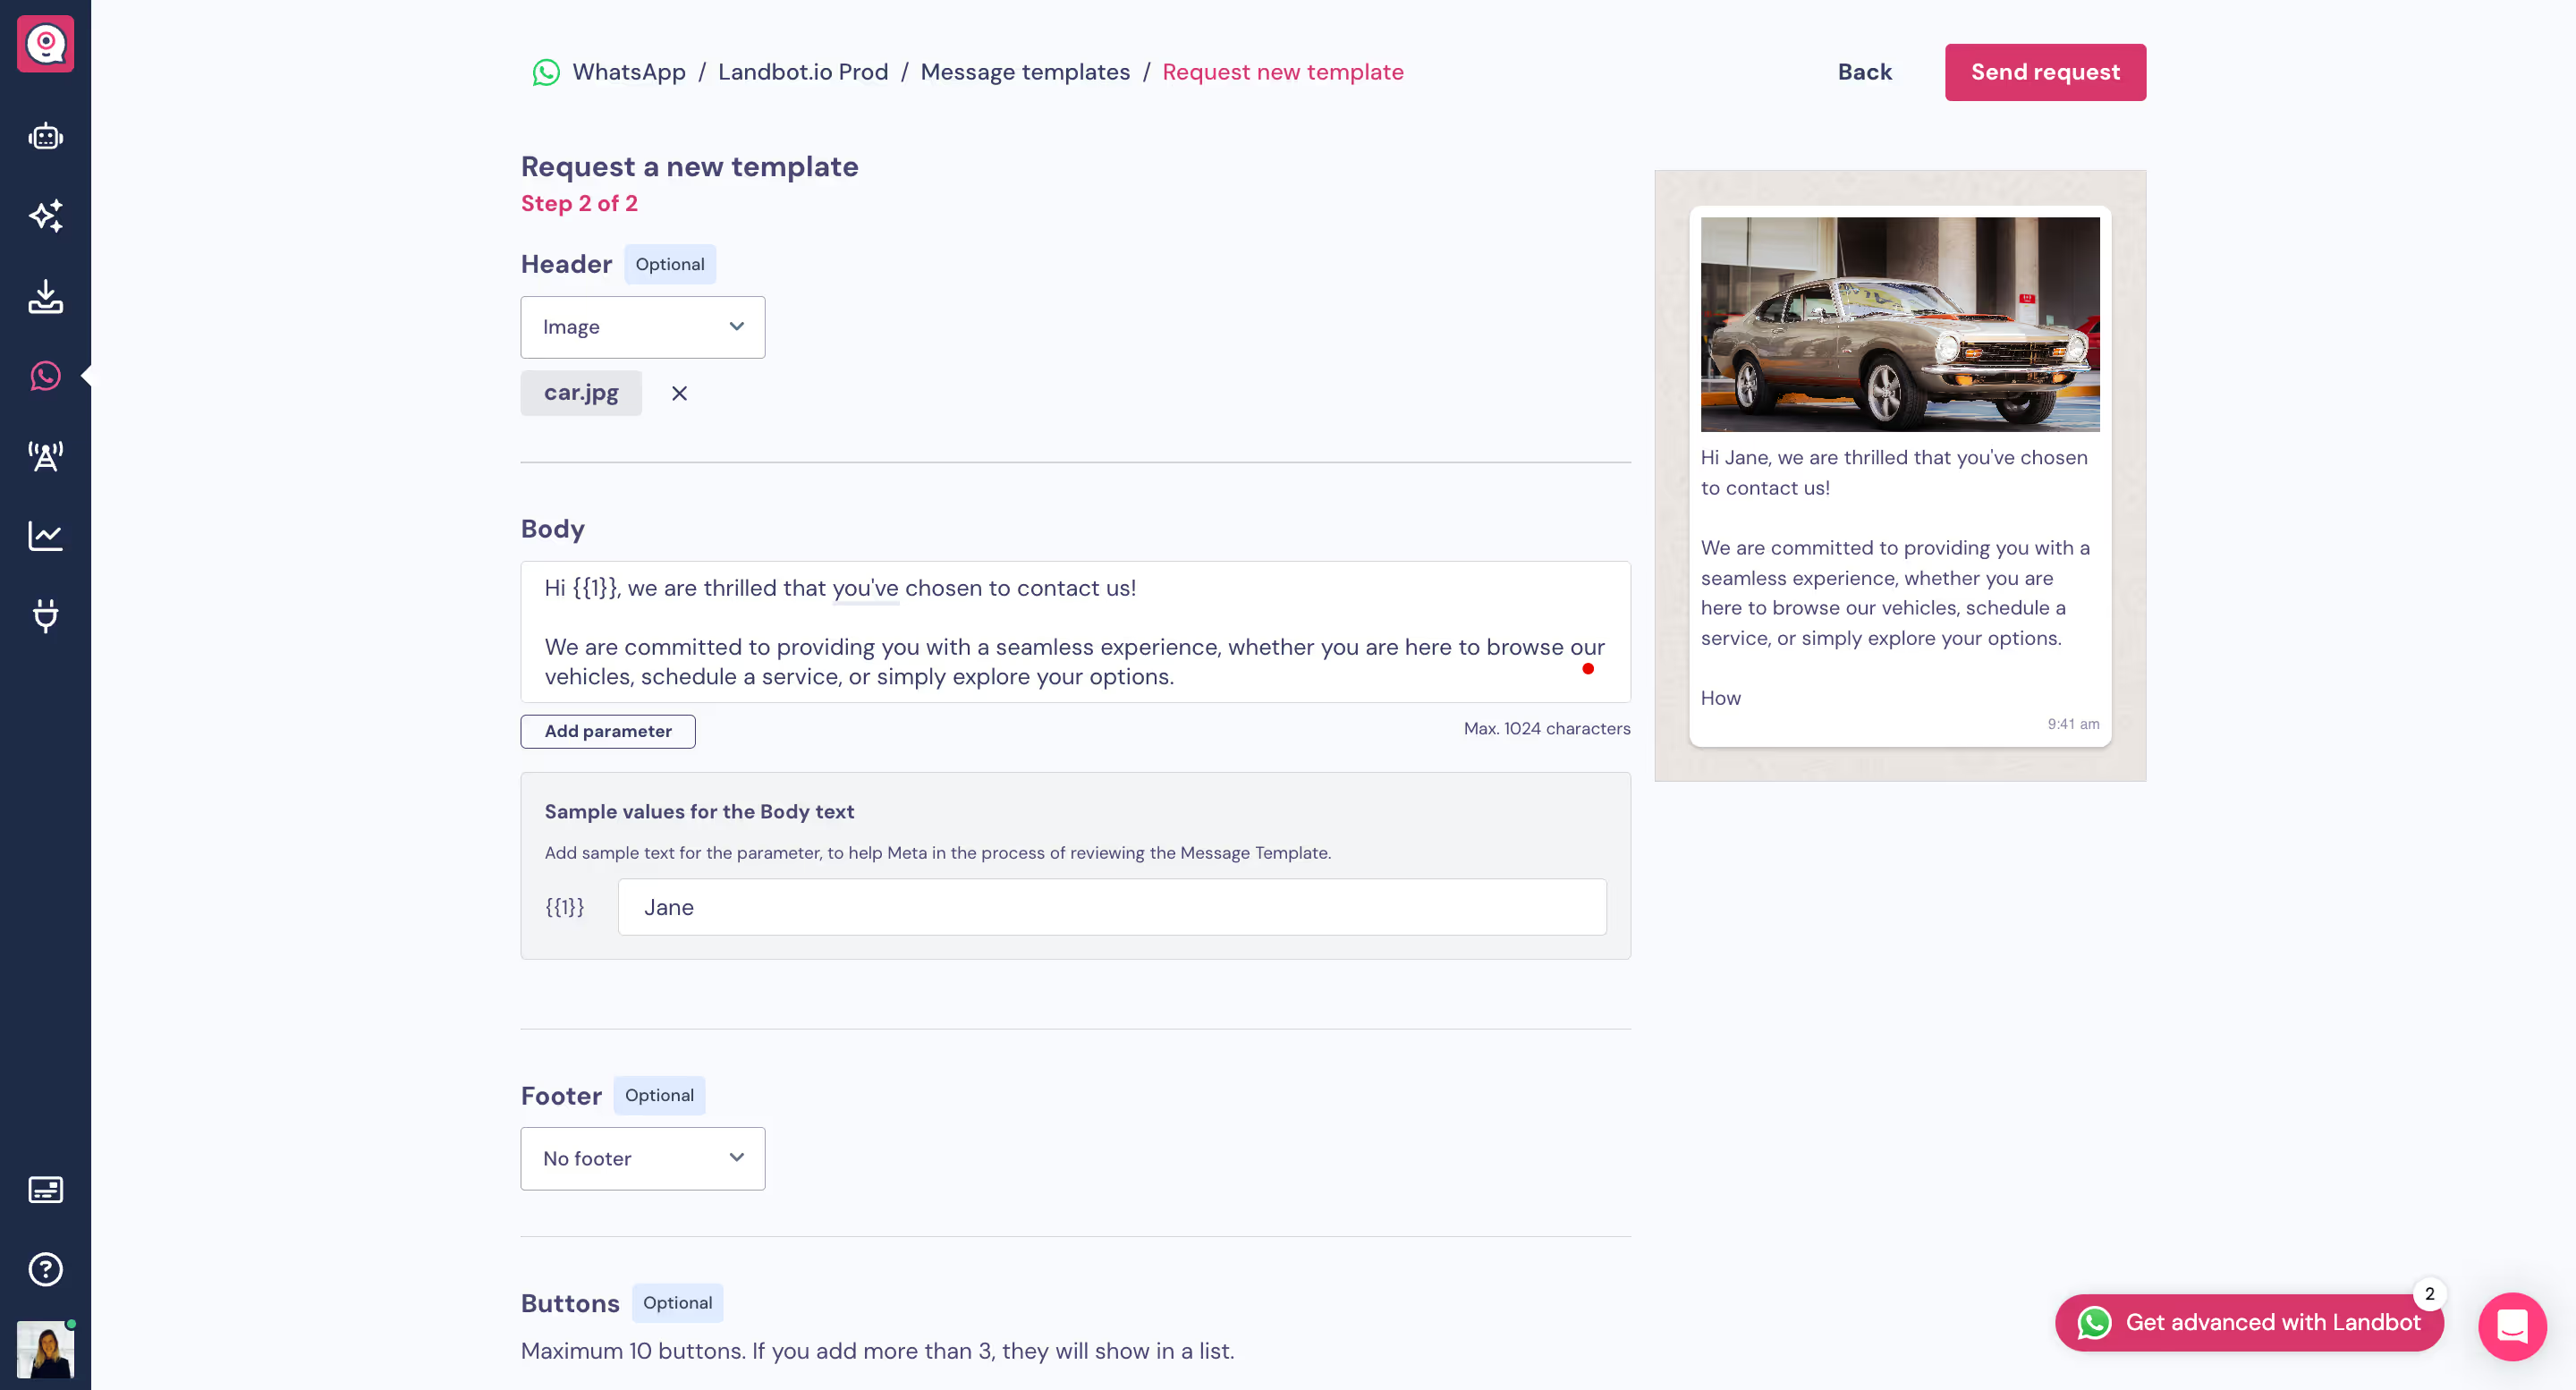
6. Now, let's create the content of the Message Template. Keep in mind this is the exact information we’ll send, and once approved, it can't be edited. Based on our preferences, we'll add a header and footer (both optional), and of course, the content in the 'body' section. Here, we can personalize the interaction using the information collected with the fields during the initial conversation flow. To do this, click 'add parameter' and fill in the sample value.
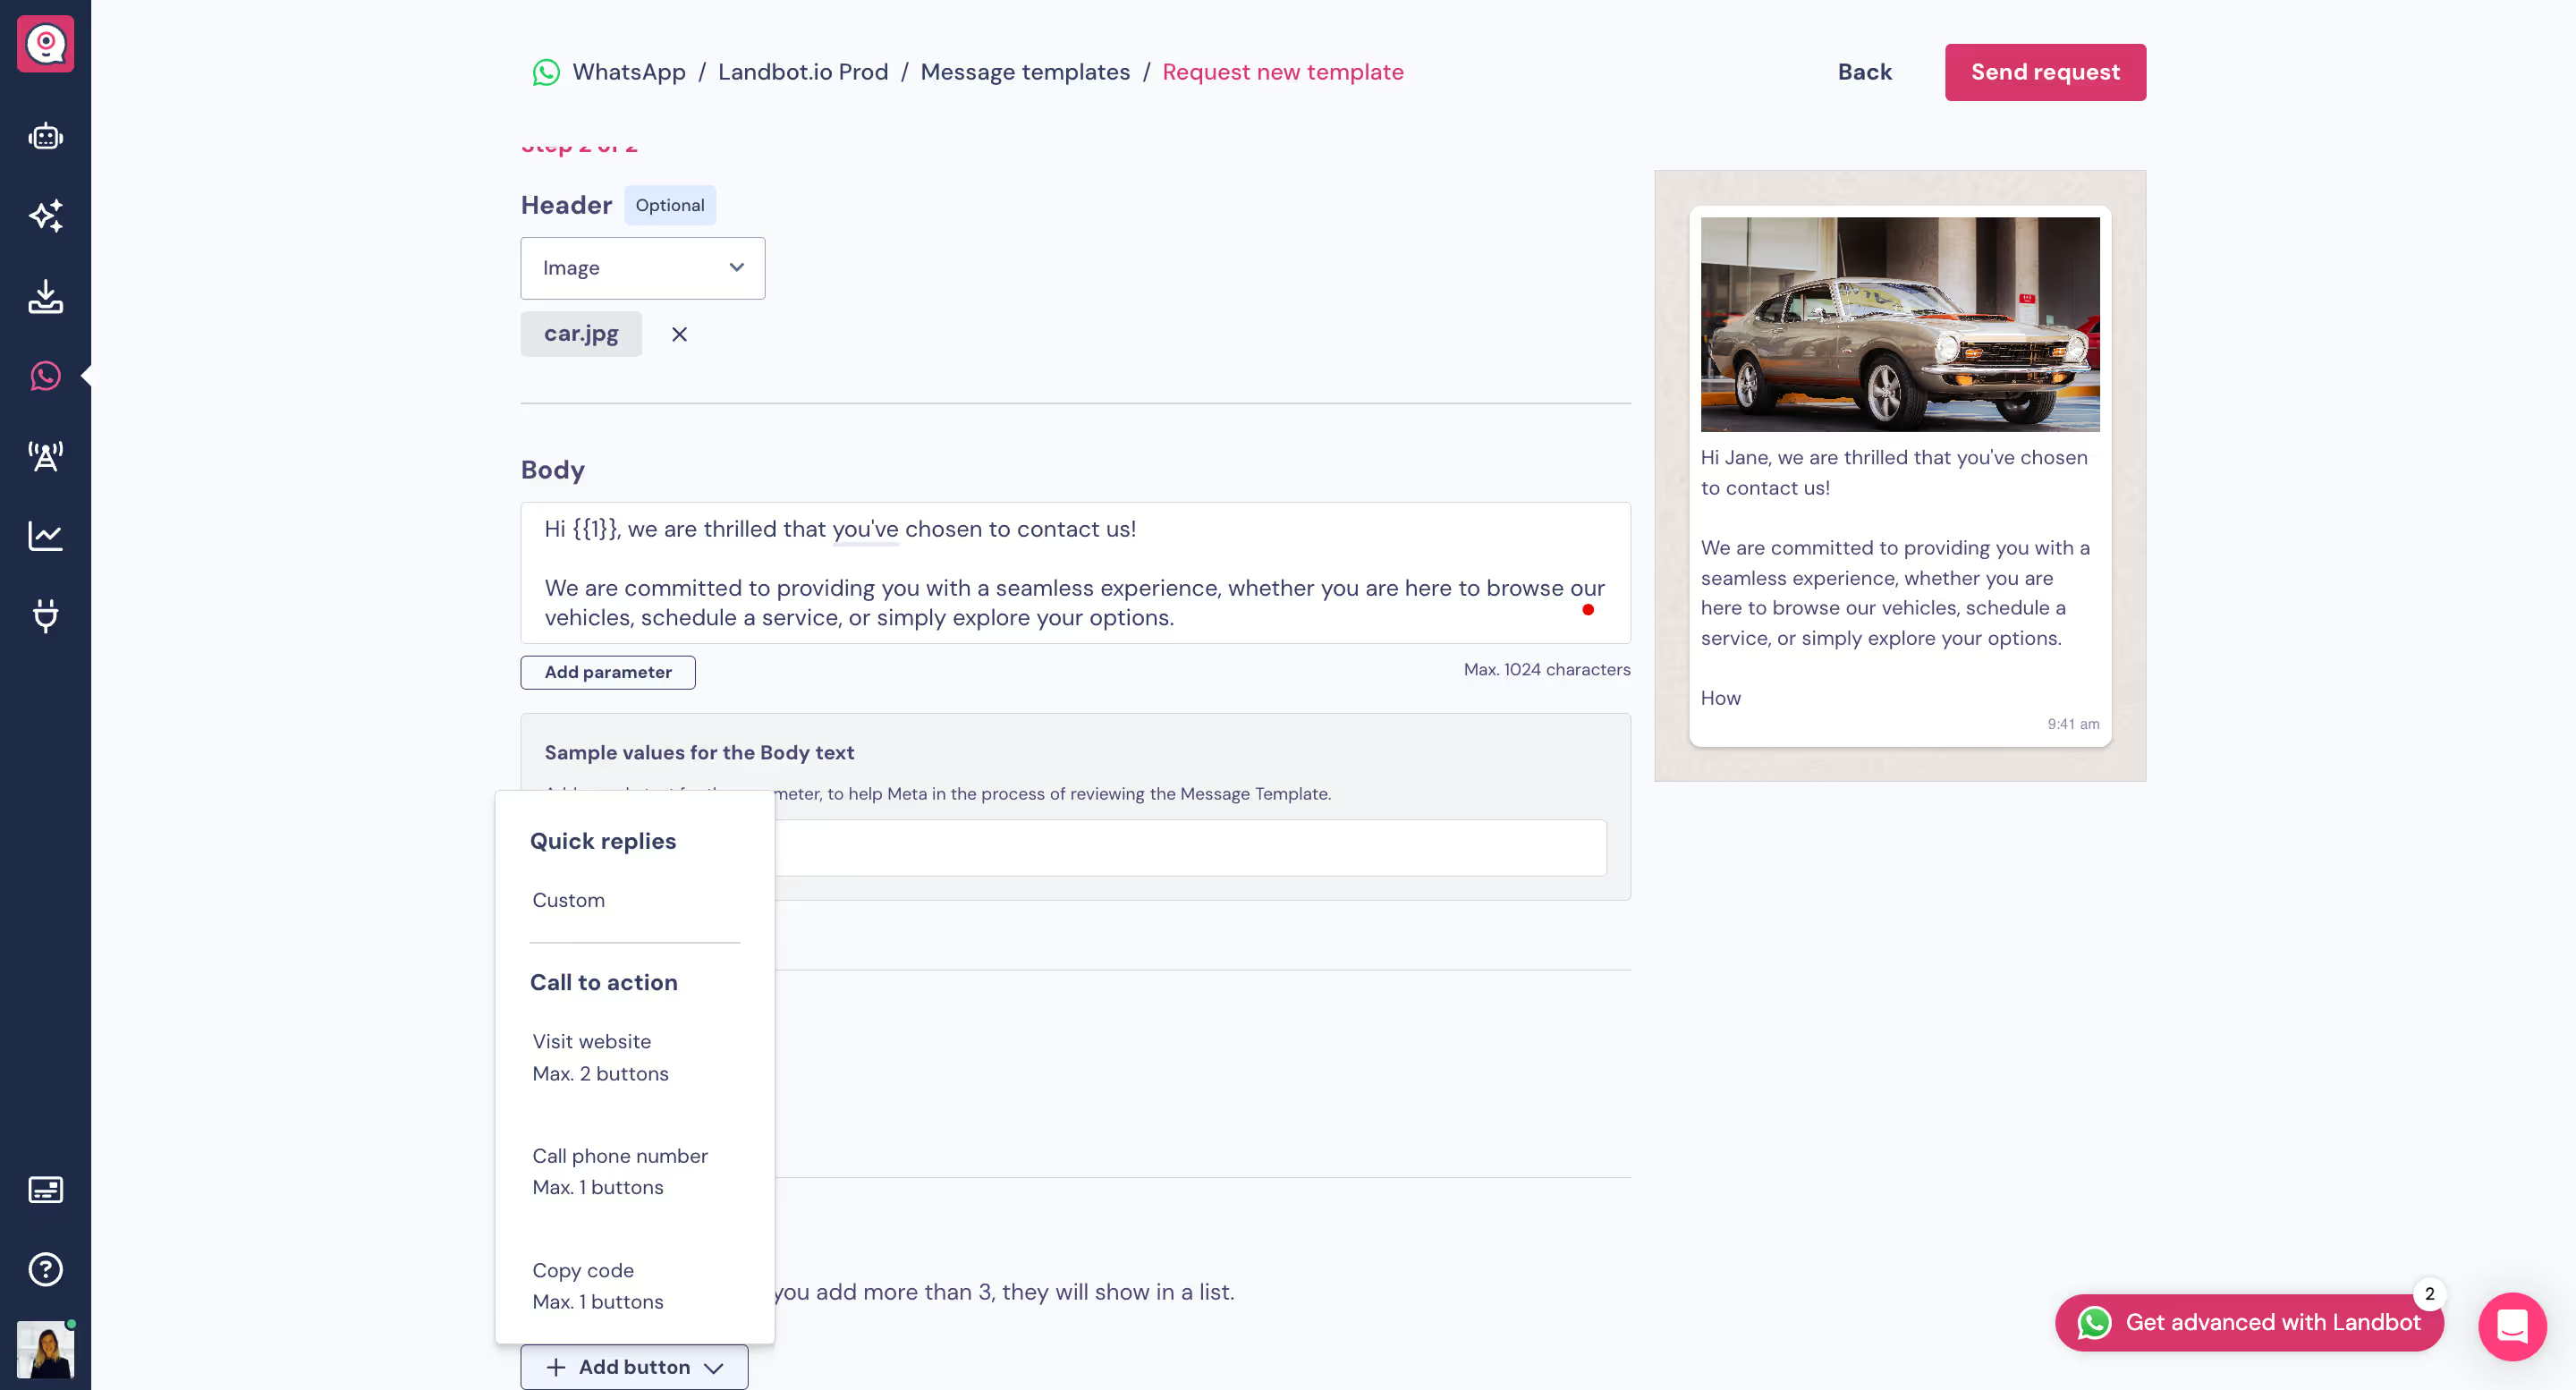
7. Finally, we'll set up the buttons. Choose the options that best suit your needs. 'Quick replies' buttons allow us to link them to other blocks, further personalizing the customer journey.
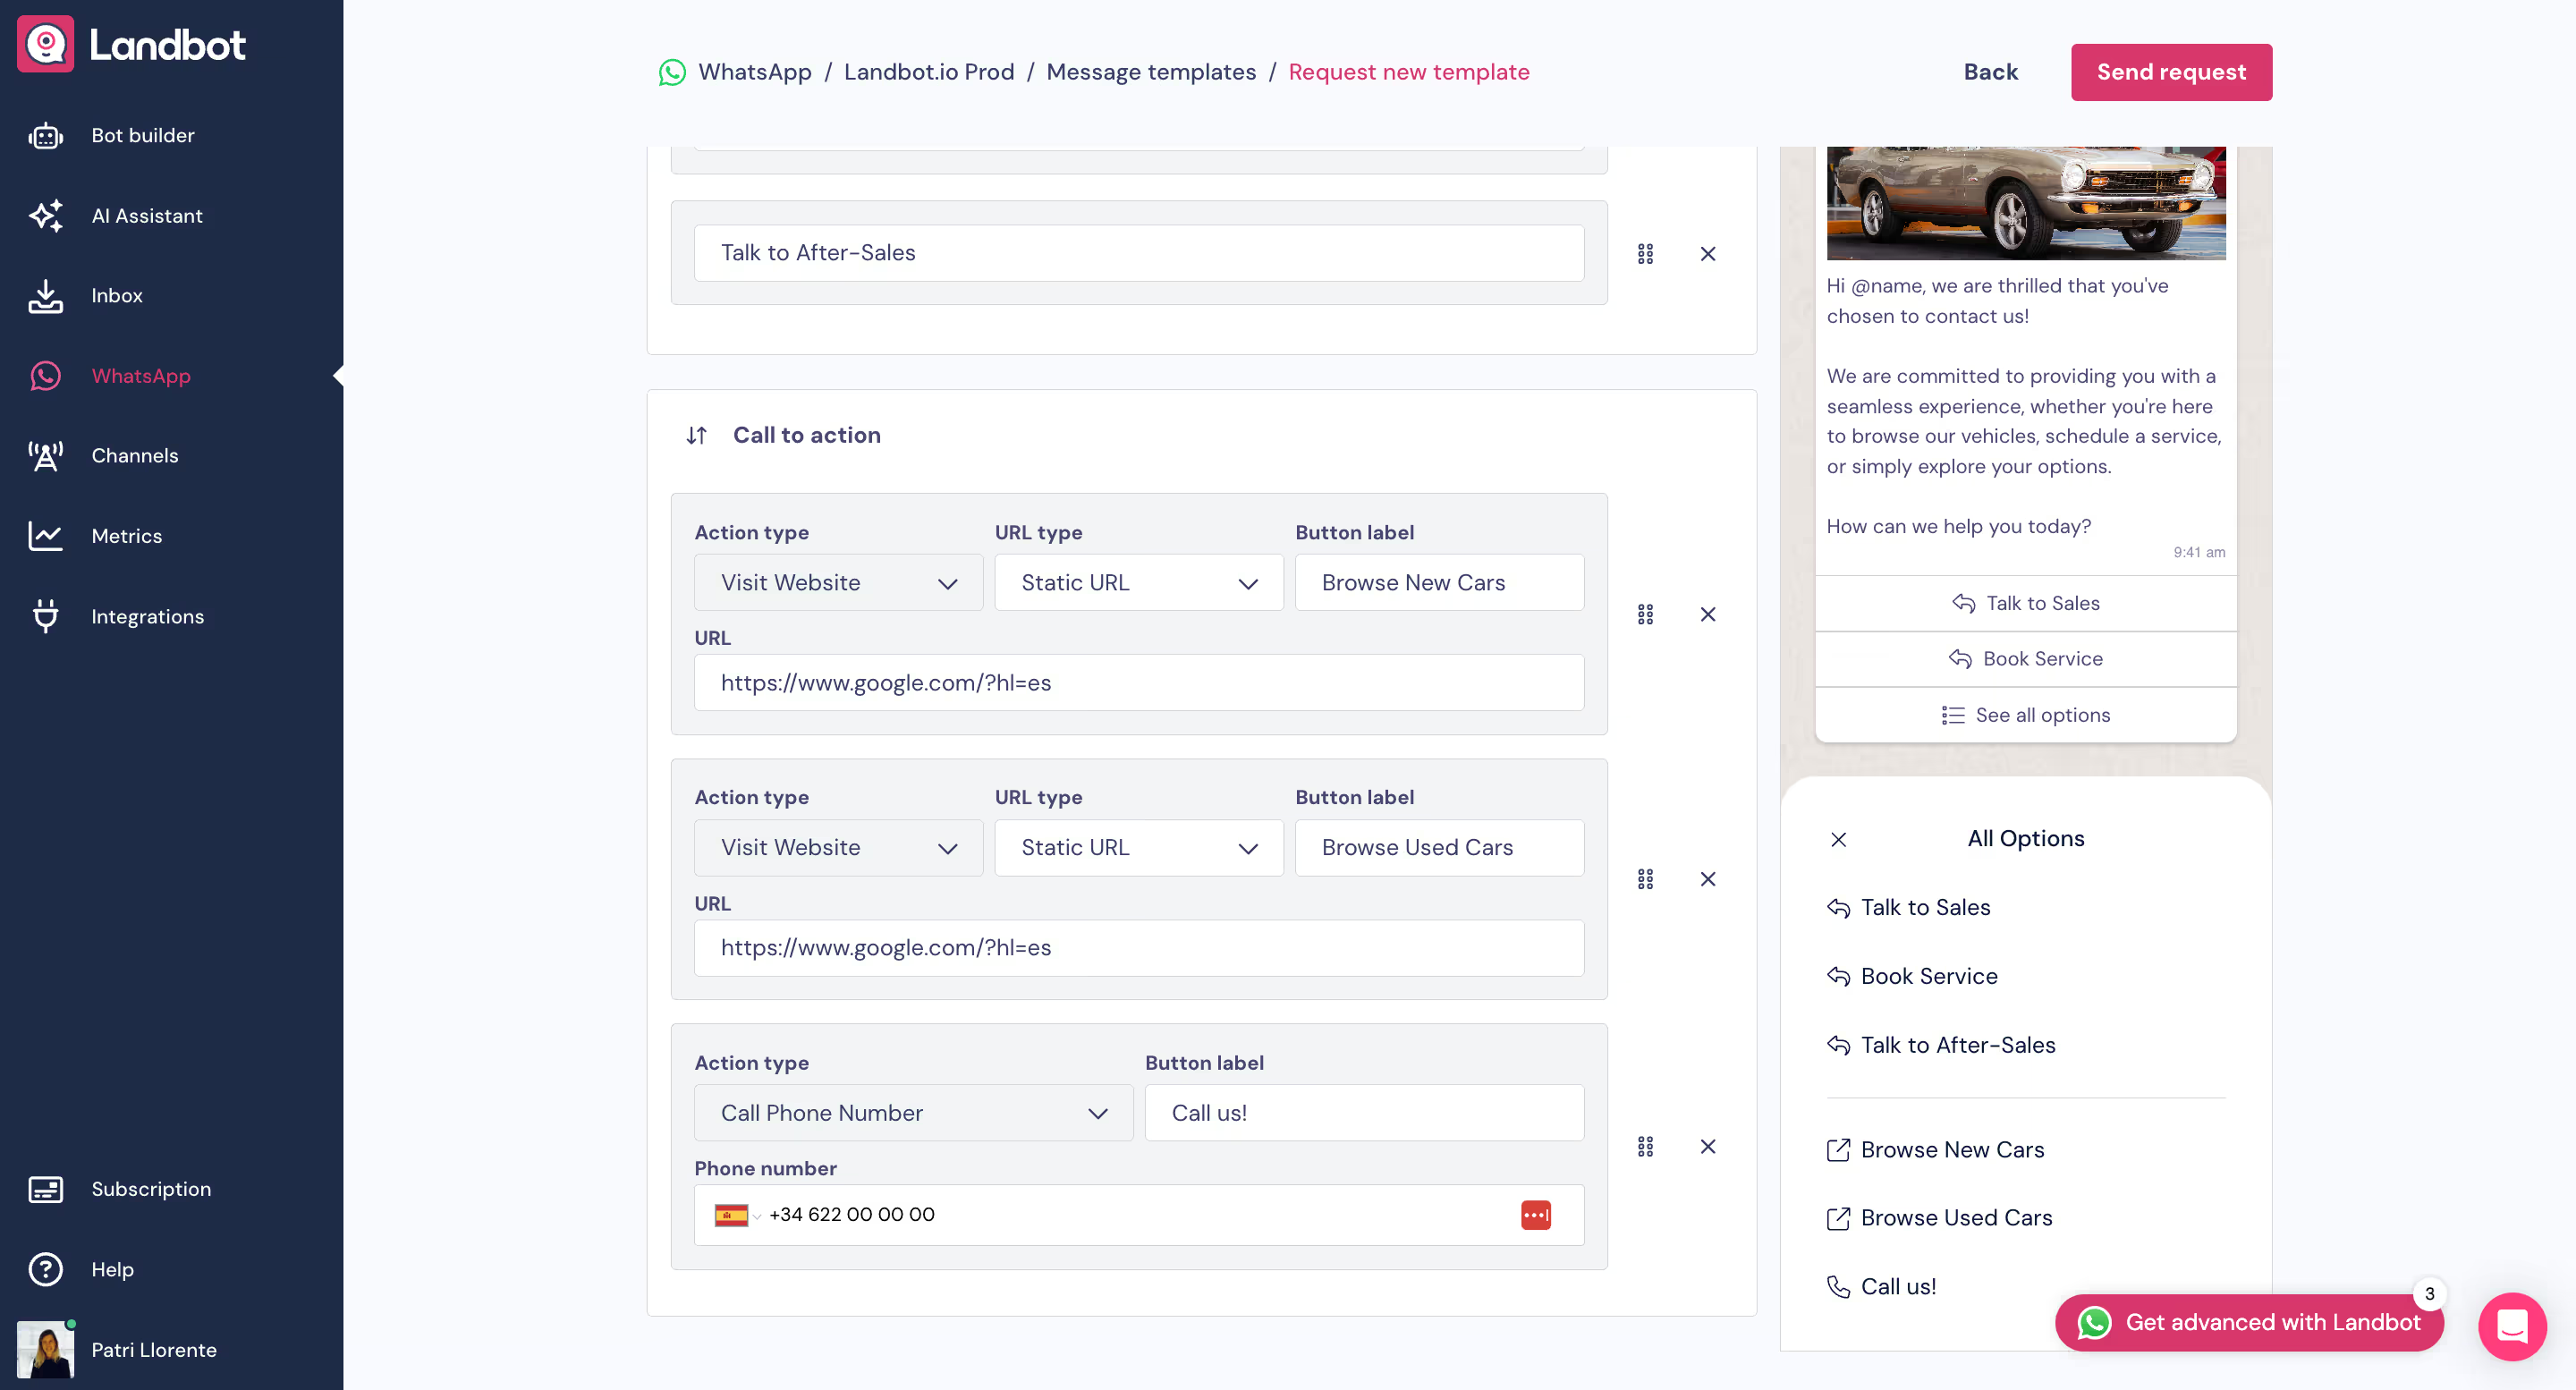
8. When ready, click ‘Send request’. Once approved by Meta, it is ready to use!
*Please note that the approval process might take from just minutes to two workdays.
Back to the builder - Adding the ‘Send a Message Template’ block to your WhatsApp bot
Alright, let’s move forward with our bot now!
1. Add the ‘Send a Message Template’ block. You will find it under the WhatsApp Essentials section in the menu.
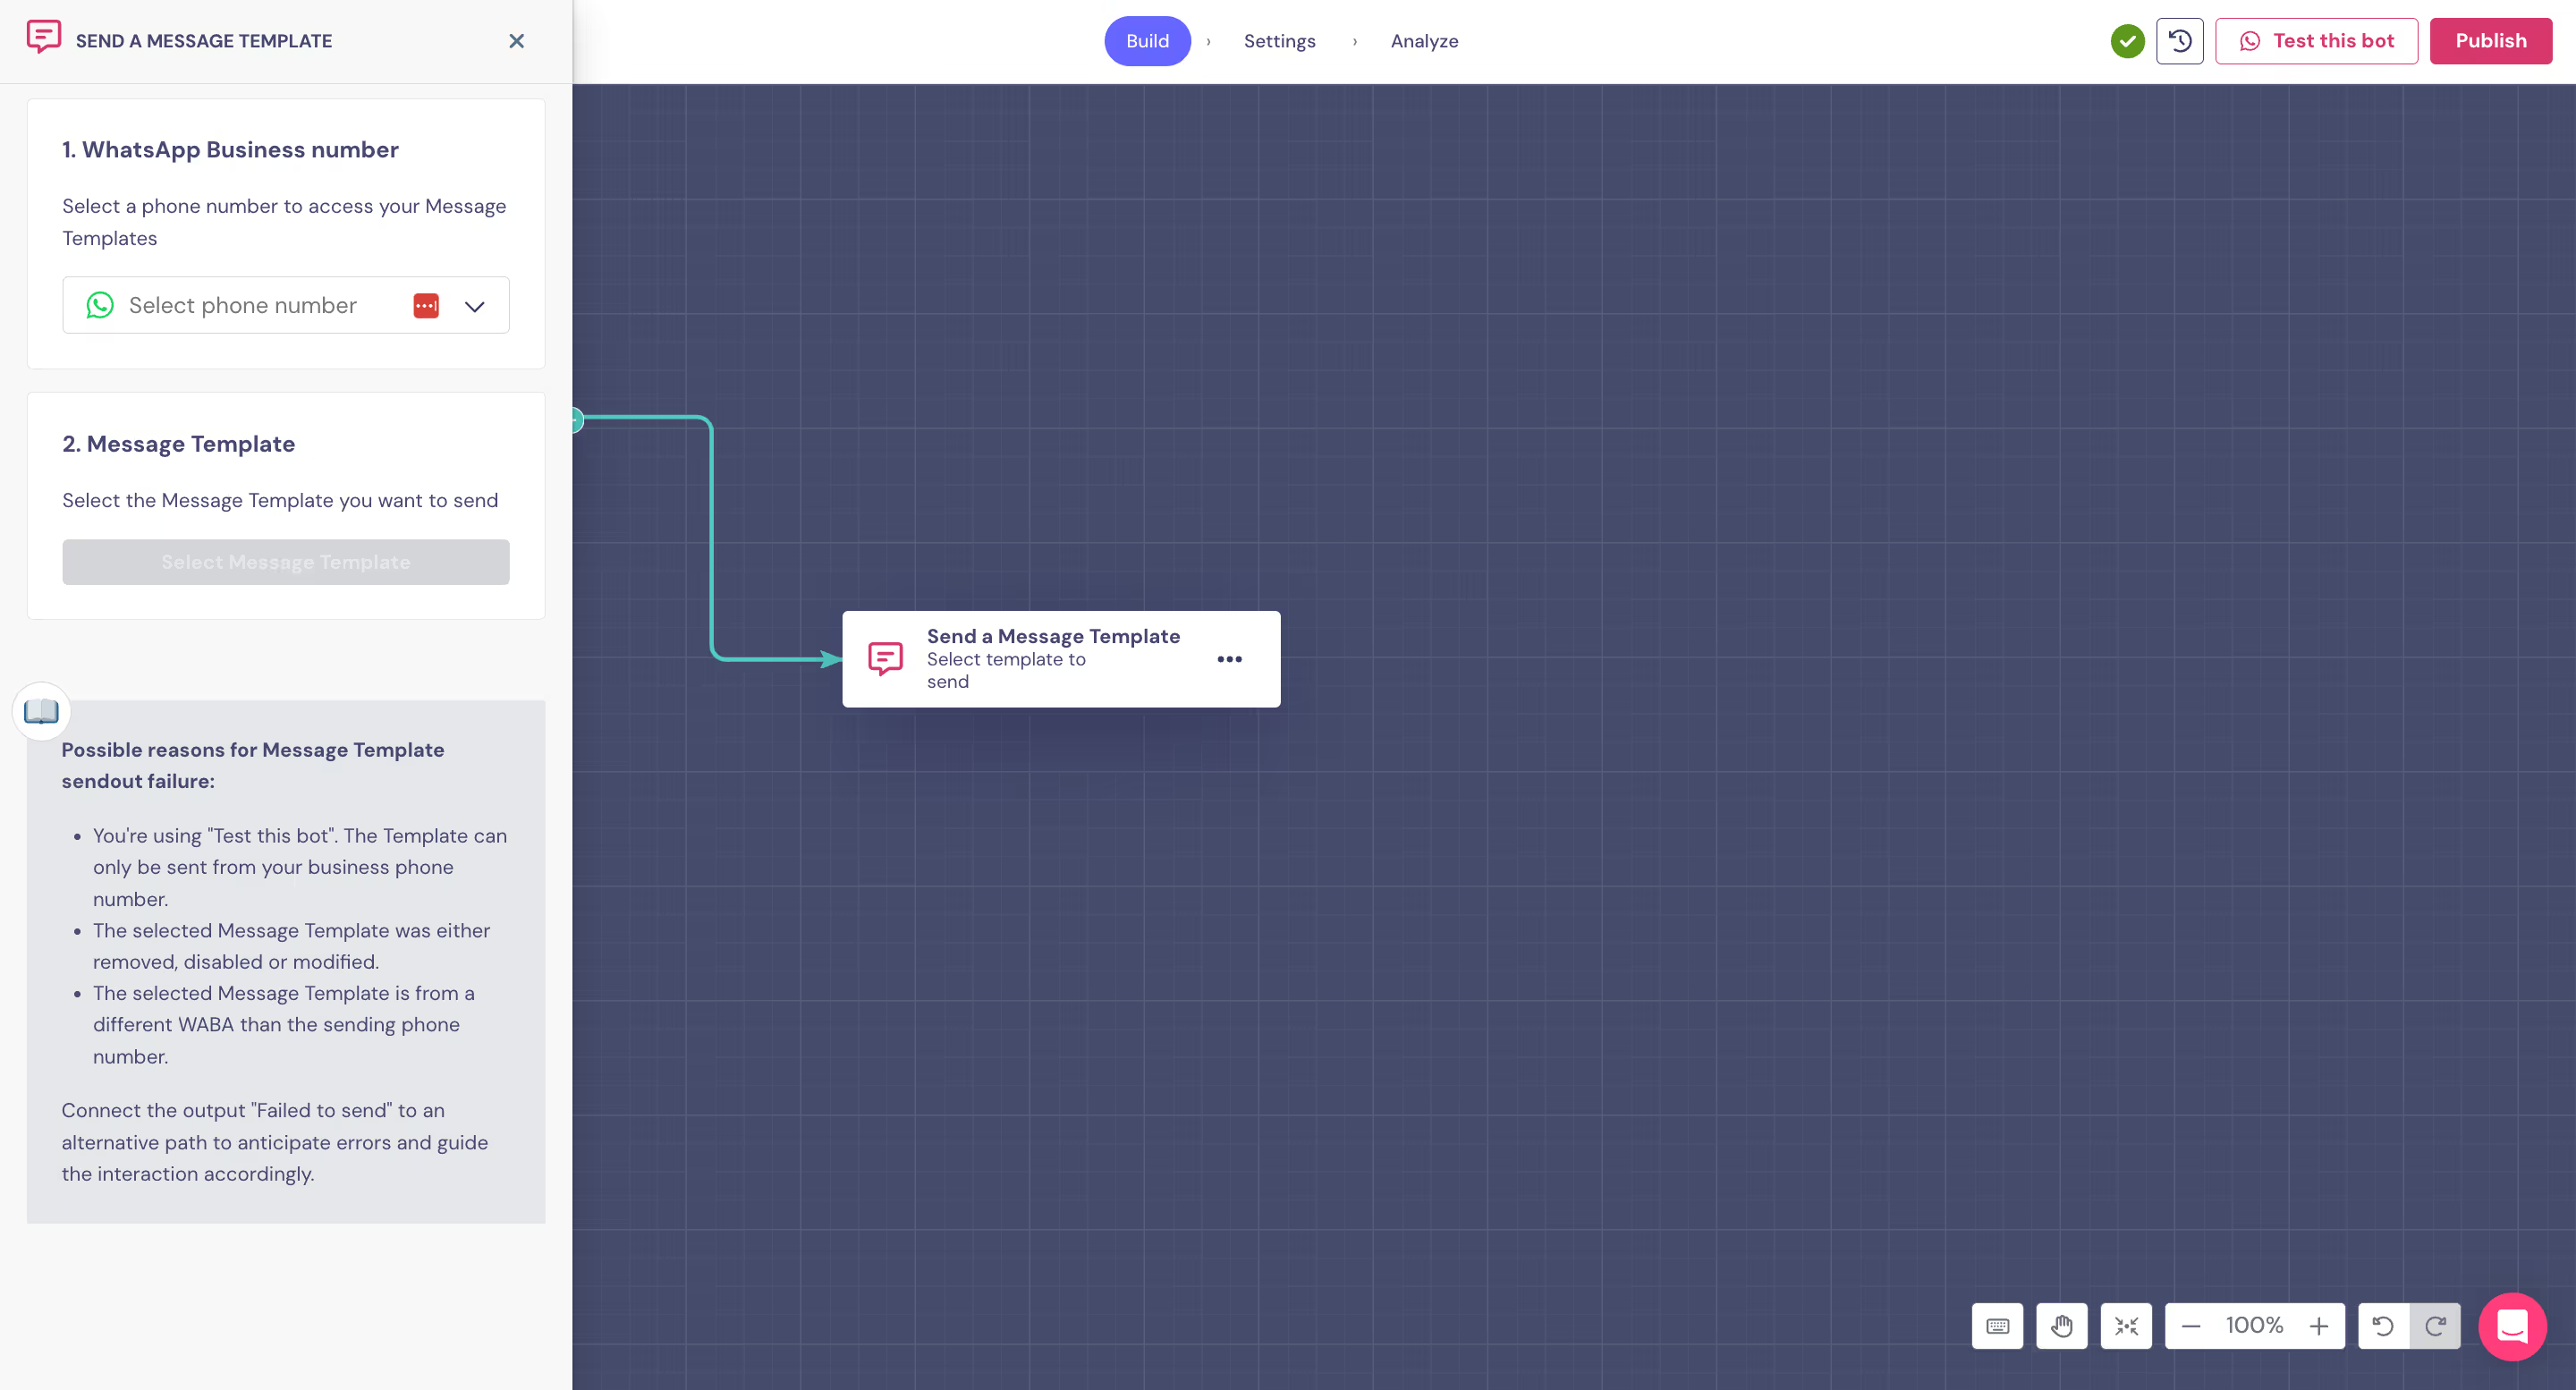
2. Choose the phone number you used to request the Template and select the Message Template. You will need to confirm the values you entered and upload any media content you added. In this case, it asks us to upload the header image and specify the sample value for the parameter we added, the field @name.
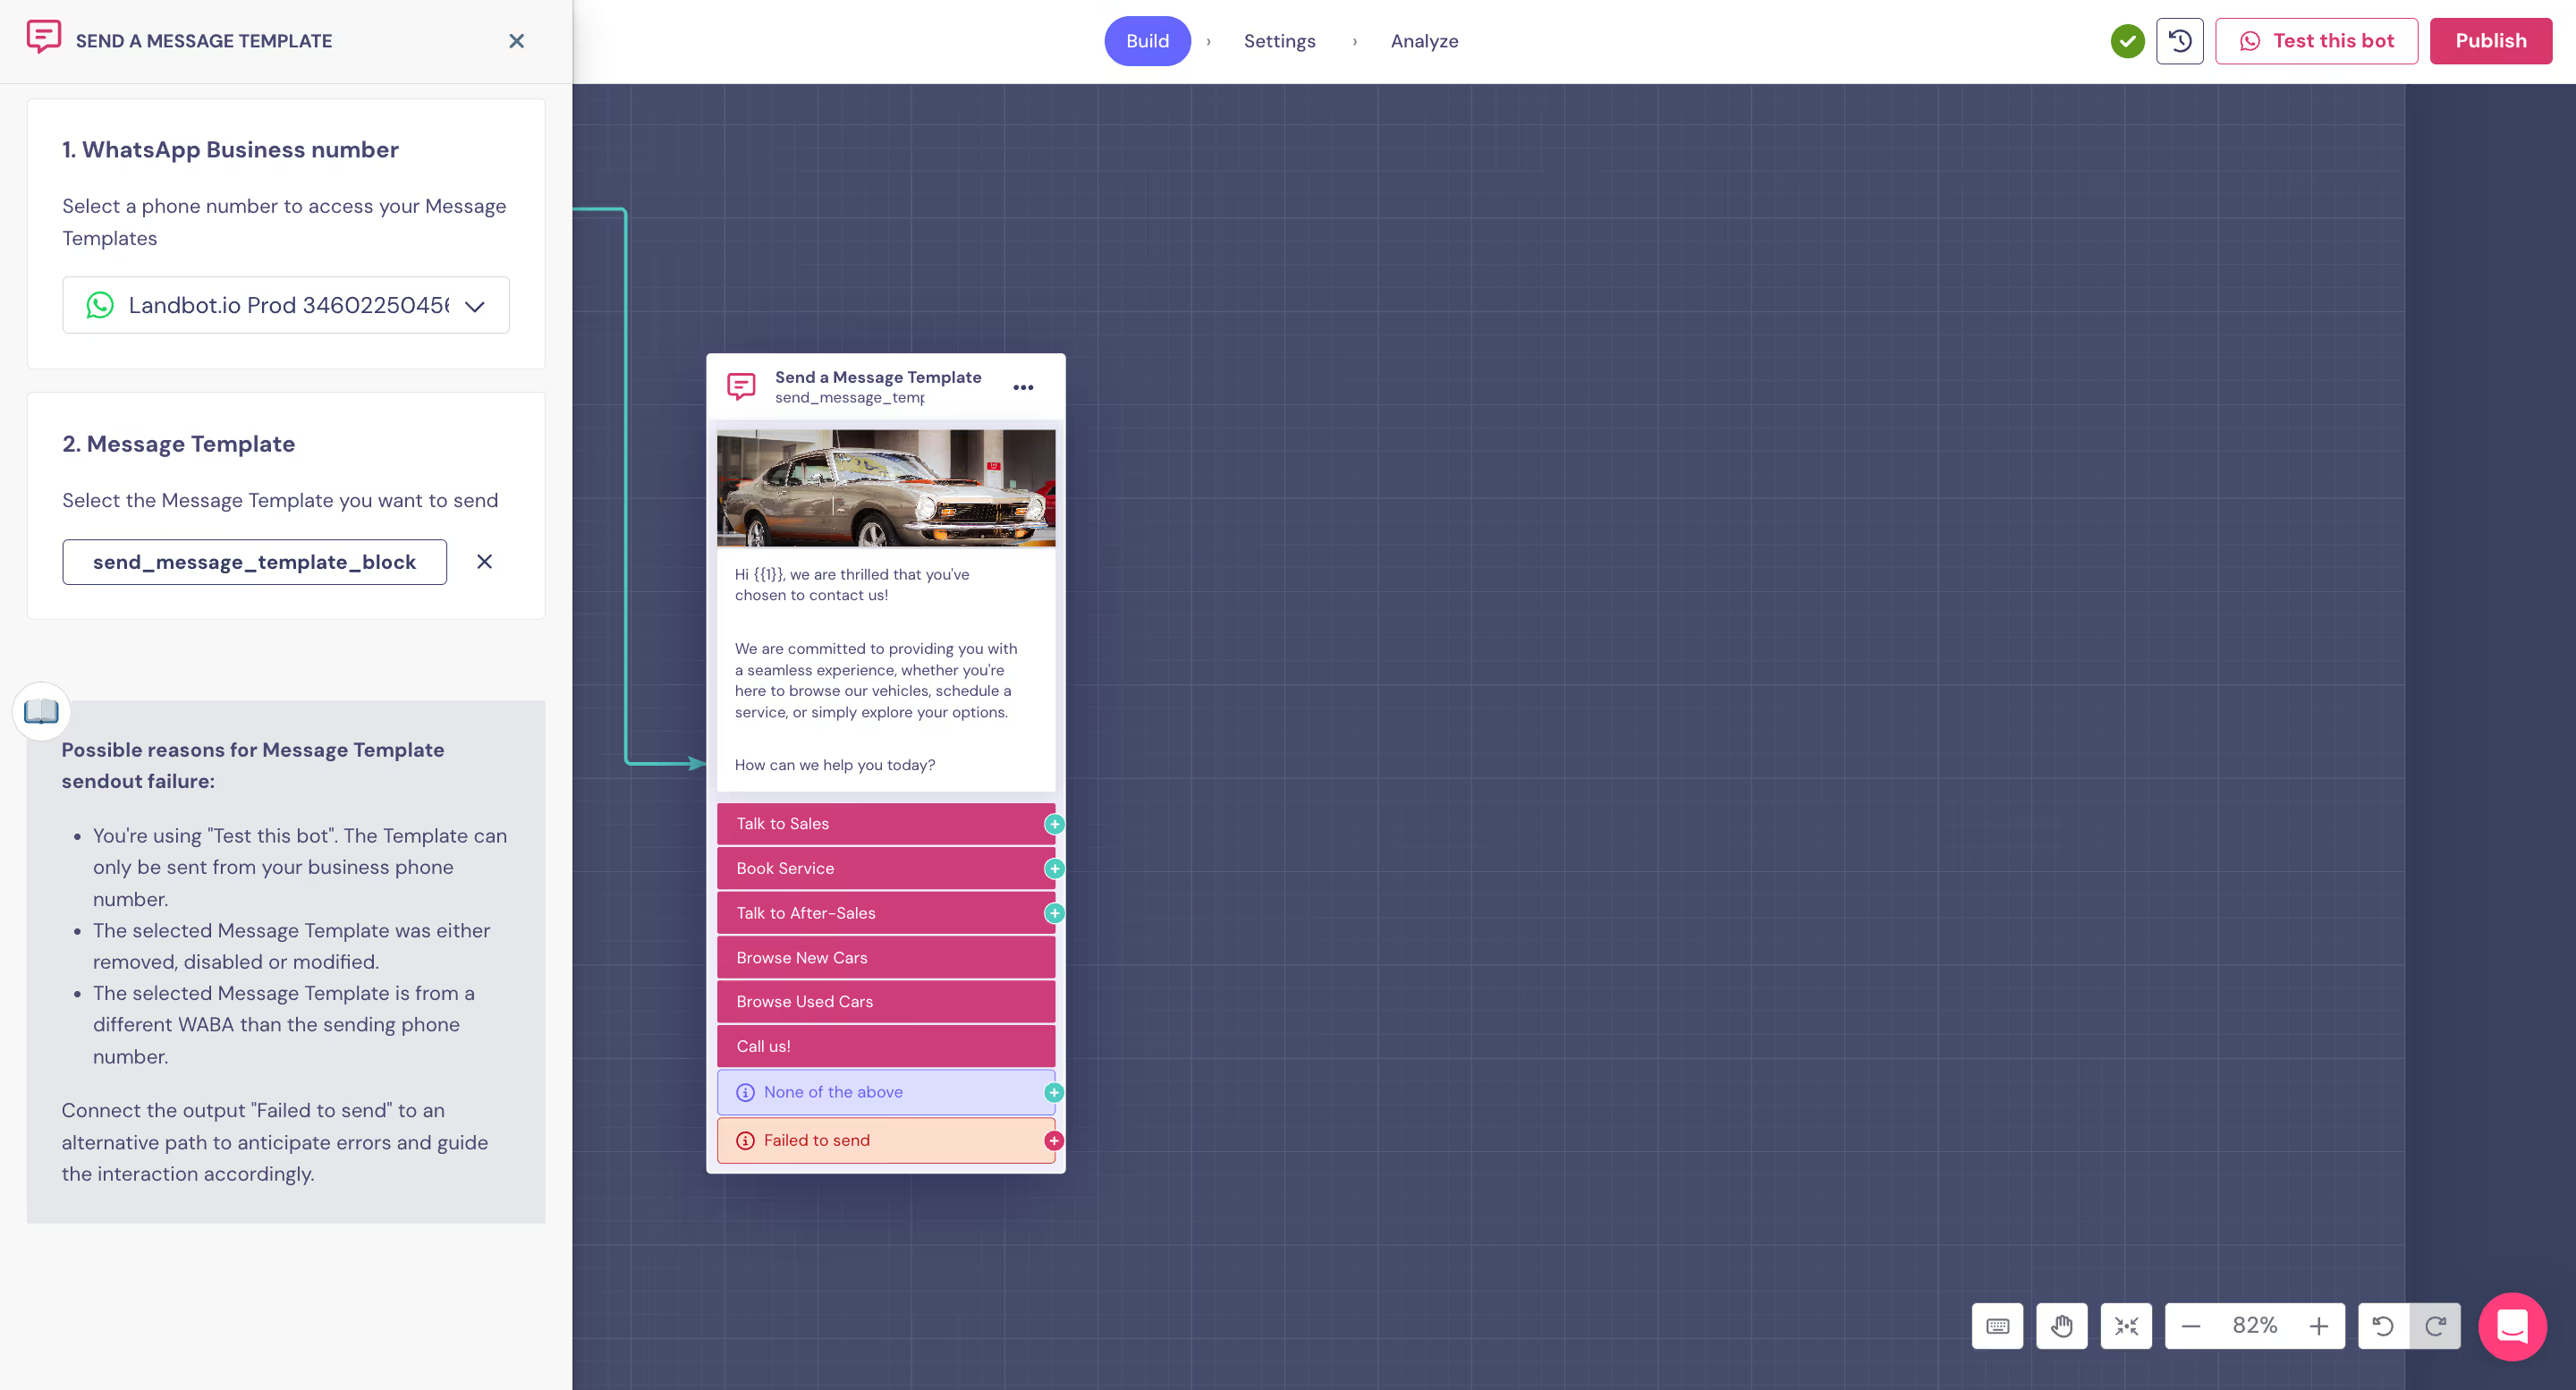
3. Click ‘Confirm values’ and it will be added to your flow! As simple as that!
Finish the Bot, Publish and Test It, and Be Amazed By Its Performance!
Now, we just need to finish the bot. In our case, we'll connect two of the 'Quick replies' buttons to the ‘Human takeover’ block to lead the conversation to our agents. The third button will be linked to an automation to gather data, which will later facilitate the appointment scheduling process. We will ask for a date and a phone number, and we will send the information to a Google Sheet, where user responses will be recorded for later confirmation of the appointment.
Feel free to explore other options for automating appointment management or any other process on our Knowledge Center!
Lastly, don’t forget to add an alternative journey in case the template fails. In our case, we linked it to a 'Human takeover' block to ensure no customer is left unattended.
That’s it! Now just publish, link the bot to the phone number, and you’ll have the link and QR code ready to include on your website or wherever you need.
*Please note that the ‘Test this bot’ functionality won’t allow you to fully test a bot that includes a ‘Send a Message Template’ block.
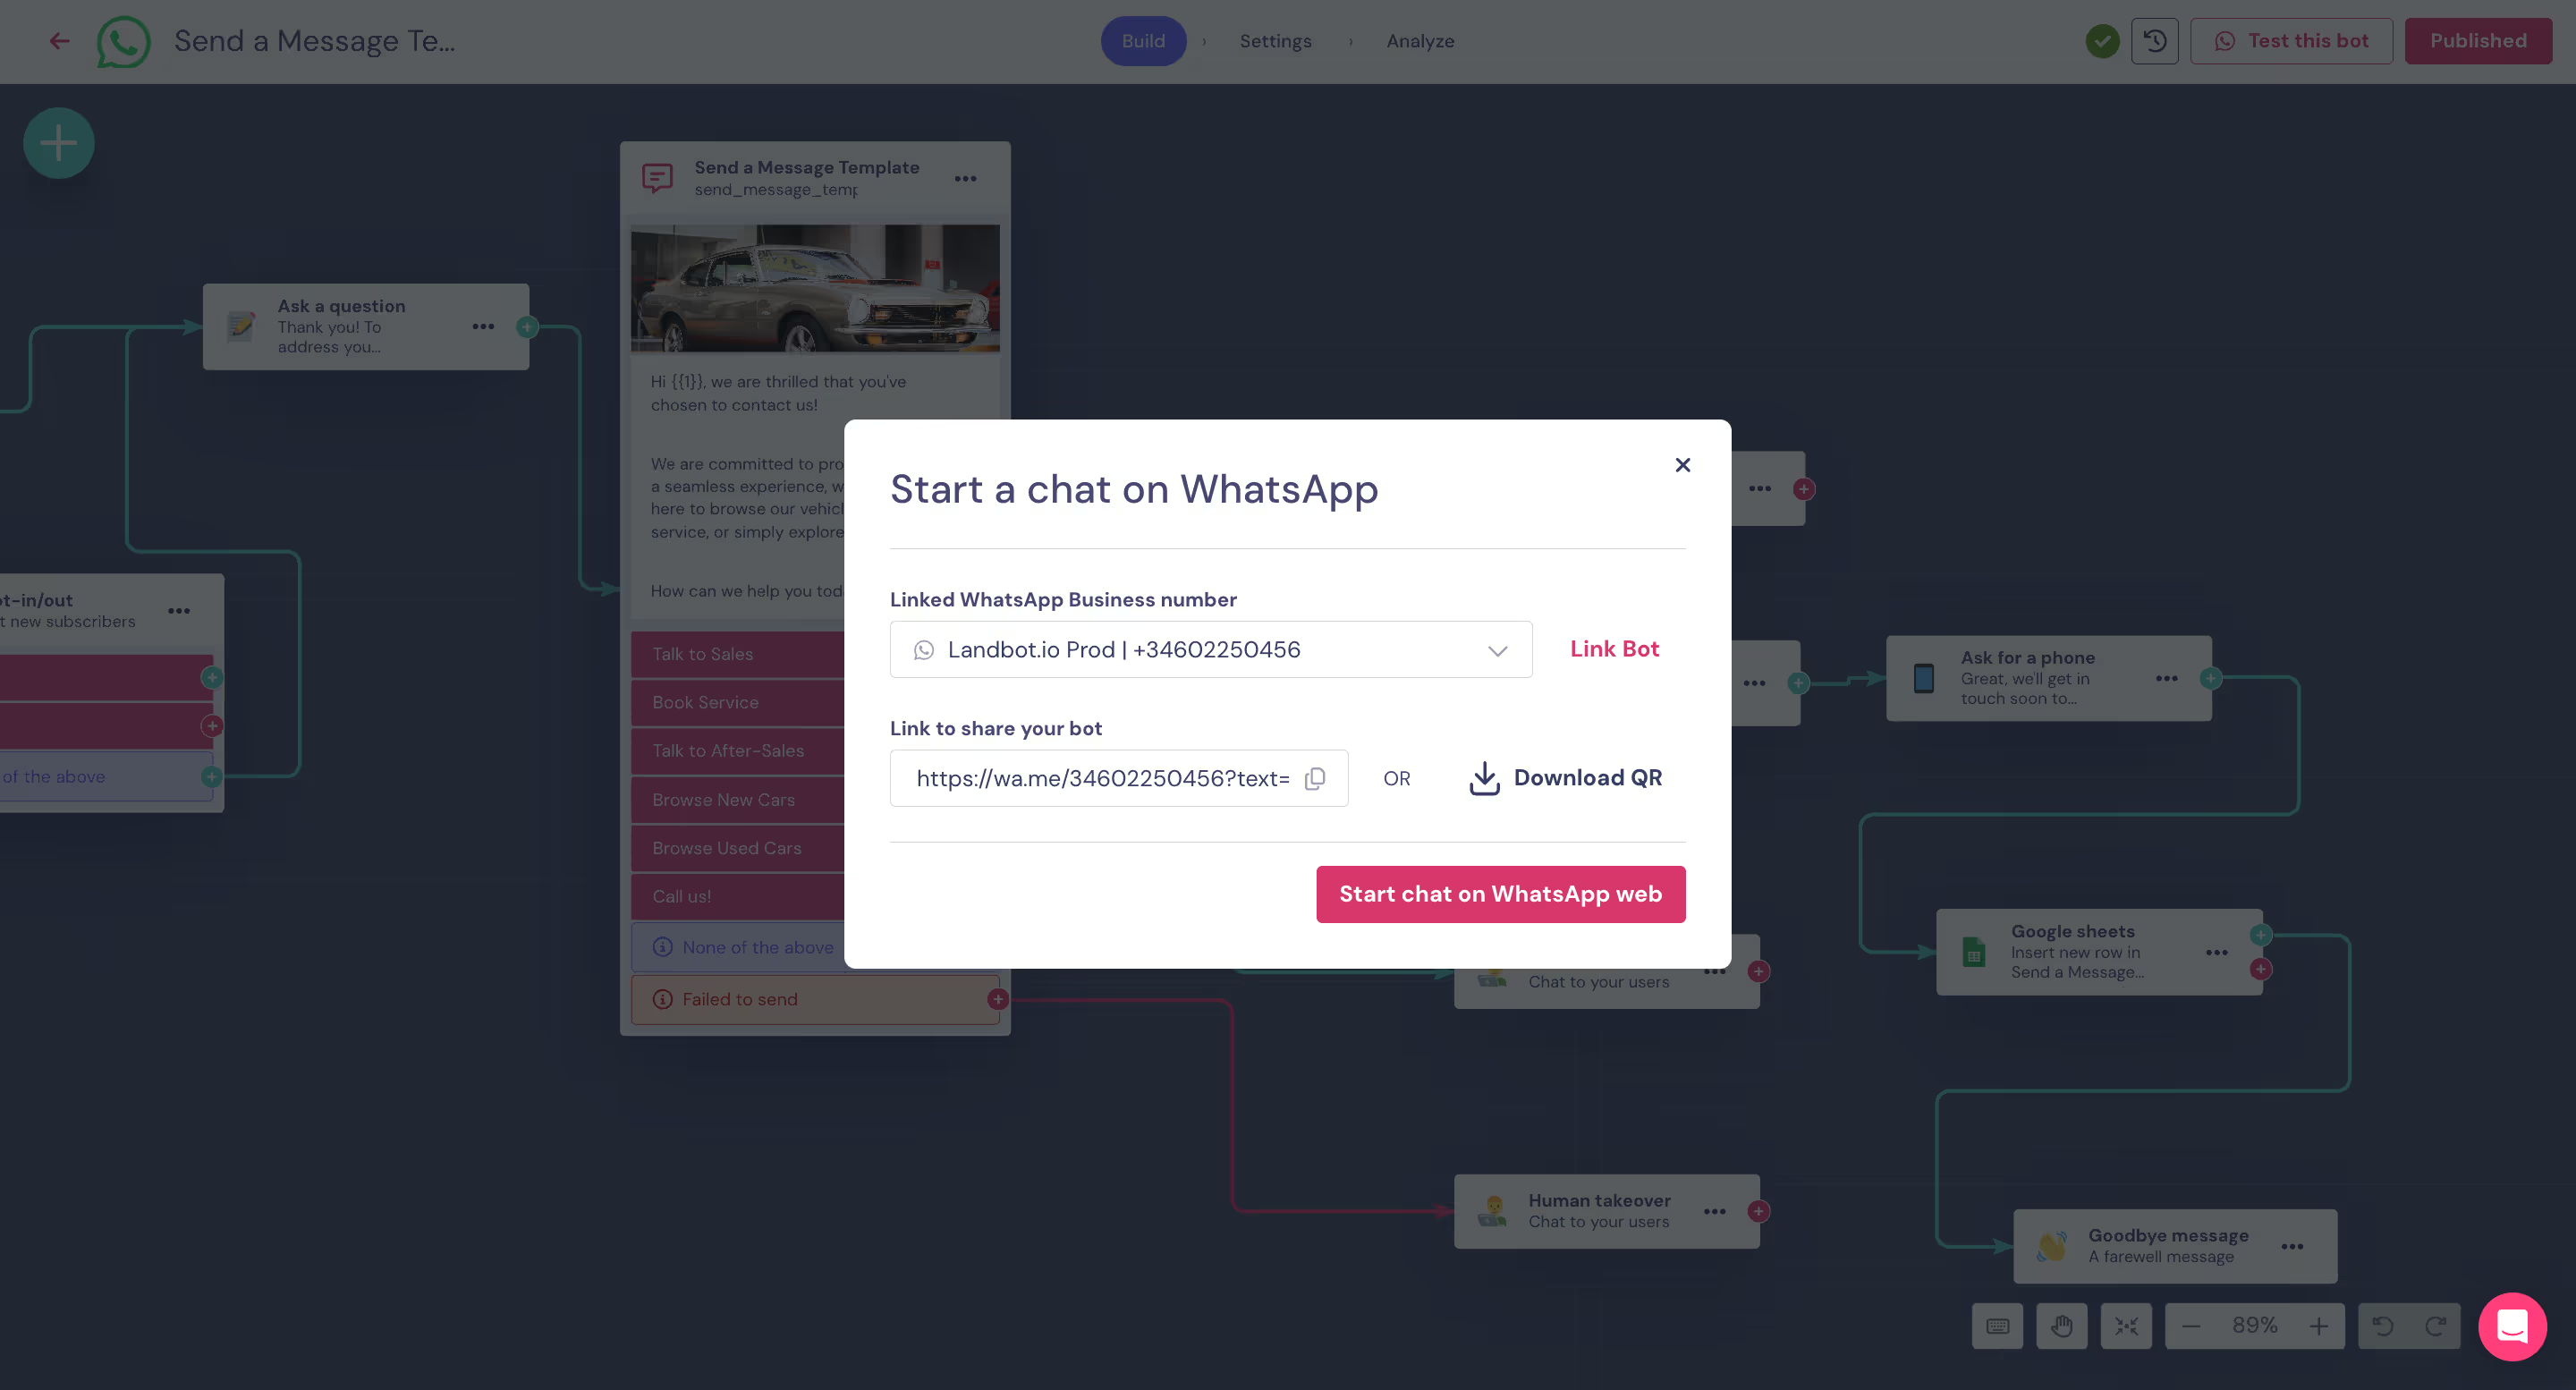
Did you find this bot example useful? It is ready for you to use as a template! Just edit it, hit publish, and start using it!
*IMPORTANT! Substitute the example Message Template with your own. Delete the block and add it back using your approved Message Template. Remember, each Message Template is approved by Meta for the specific linked WhatsApp Business Number and won't function outside of it.
Do you want to have a comprehensive overview of the process of adding the ´Send a Message Template' block? Watch the video below!
Conclusion
In conclusion, the Landbot Send a Message Template block is a powerful tool for businesses using WhatsApp bots for customer communication:
- WhatsApp Message Templates are pre-approved messages that ensure consistent and professional communication.
- The process involves requesting a template through Meta, choosing appropriate categories, and creating personalized content.
- The ‘Send a Message Template’ block seamlessly integrates these approved templates into your chatbot flow.
- This feature allows for efficient automation of customer interactions, including gathering data that can be stored in fields for personalization or human takeover options, among many others.
- By combining Message Templates with other Landbot blocks, businesses can create sophisticated, personalized customer journeys.
Ready to implement this WhatsApp feature to improve your customers’ experience?


.avif)


.avif)
.avif)
.avif)
%20(1).png)
.avif)


%20(1).png)
%20(1).png)
