

.avif)
.svg)
Please note that 'Variables' are now called 'Fields' in Landbot's platform.
AI chatbots have evolved far beyond simple scripted responses. Today, they combine rule-based logic with powerful natural language processing (NLP) models, such as OpenAI’s GPT, to create smart, conversational assistants that can engage, support, and convert users across various platforms.
Whether you're looking to generate leads, support customers, or automate FAQs, building an AI chatbot can significantly enhance the user experience, reduce the workload for your go-to-market teams, and improve both efficiency and profitability.
In this guide, we’ll walk you through everything you need to know to build an AI chatbot using Landbot.
Define the Scope of Your AI Chatbot
Jumping straight into the building process can be tempting, but successful AI chatbots start with a defined strategy. A clear scope sets the foundation for a chatbot that not only works but performs at its best.
What’s your Chatbot’s Goal?
Think of your AI chatbot as a digital member of your go-to-market team.
To define its goal, start by answering these questions:
- What problem am I solving for my users?
- What business goal will this chatbot support?
- What success metrics will I track? (e.g., leads captured, questions answered, conversions, managed tickets, etc.)
The clearer your goal, the easier it’ll be to build your AI chatbot and measure its impact.
Here are some examples of how Landbot customers use AI chatbots to achieve their go-to-market goals:
- Lead generation: Like Choices did, you can qualify website or WhatsApp visitors, ask qualifying questions, and capture contact info.
- Support automation: an AI chatbot can be your greatest ally when it comes to providing assistance and answers to common questions using your own Knowledge Base. That’s exactly what FASTA did to reduce by 20% their phone and email dependency and their request resolution times, by increasing efficiency and improving customer satisfaction.
And other use cases for which you can launch an AI bot:
- Lead qualification: your AI chatbot can qualify leads while taking them through interactive flows and AI-driven suggestions.
- Feedback collection: Once the interaction with your leads is over, whether they have purchased your product or not, you can trigger feedback and satisfaction surveys so they can evaluate their interaction with your brand.
Appointment booking: You can also integrate your AI chatbot with your calendar to automate the scheduling process of demos, visits, appointments, or meetings.
Build Your AI Agent (Step-by-Step)
Now that you know what an AI bot can do and have defined the go-to-market goals it will help you achieve, it’s time to get down to work and start creating our AI Agent!
Unlike linear bots that rely heavily on buttons and logic trees, AI agents use conversational AI (like GPT) to engage users in more natural language conversations.
With Landbot’s AI agent capabilities, you can:
- Train the agent with your own content
- Control its personality (set tone, behavior, and limits)
- Define custom instructions for how it should handle queries and behave
- Guide key actions like lead capture or handover
Plus, you can integrate your AI Agent with greater flows, or even with your own CRM and other tools to create an even more powerful AI agent.
So, let’s get to it! If you still don’t have a Landbot account, it’s time to create one for free so you can follow the process.
Note: If you prefer to follow the instructions by watching a video, we recommend this tutorial:
Select the Channel for your AI Agent
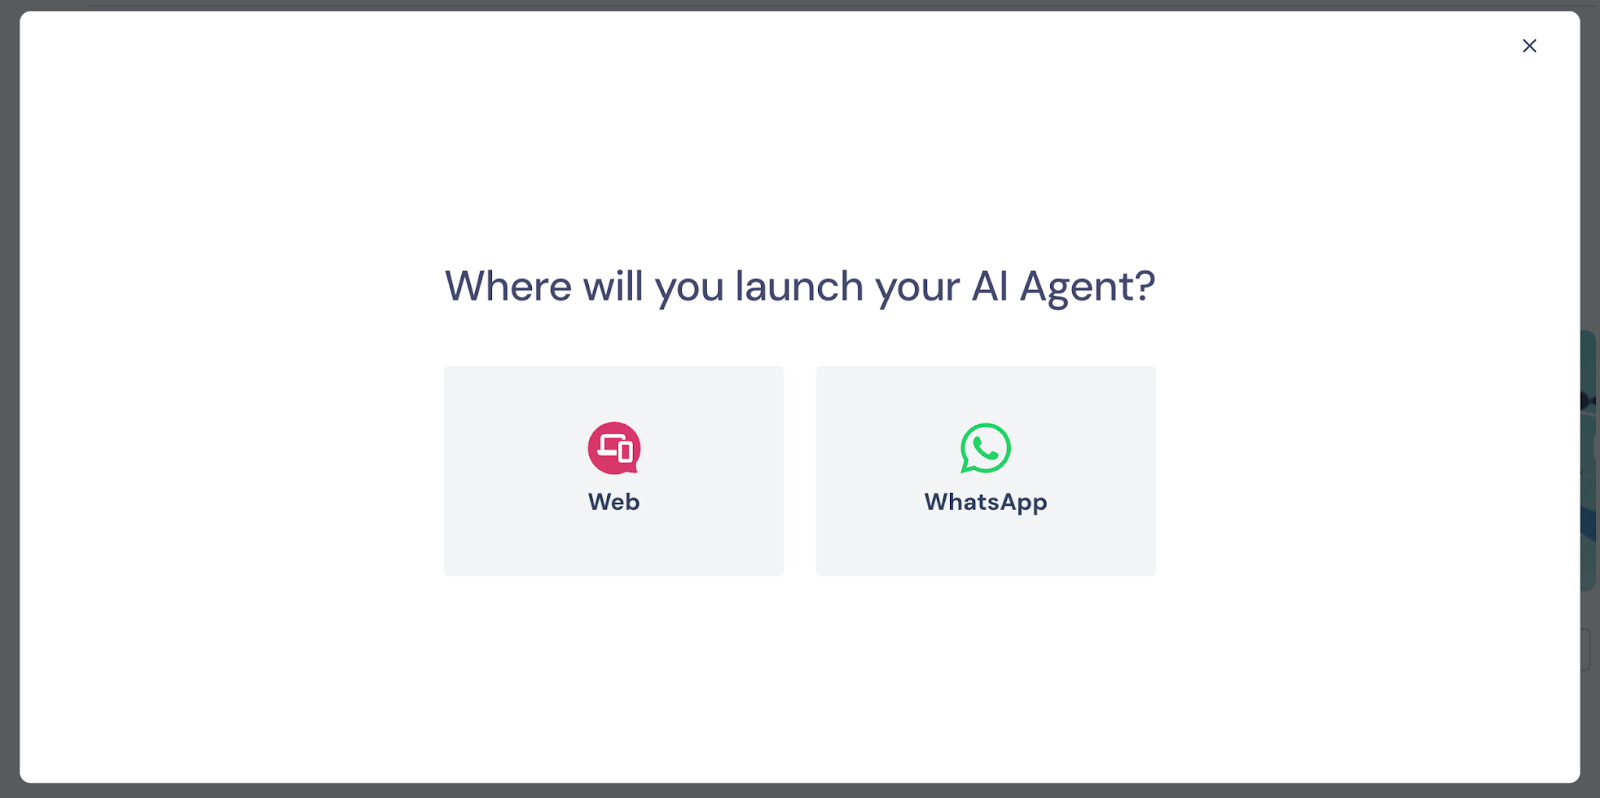
The first step is to select the channel where you will want to launch the chatbot. Once you access the Landbot platform, you will find direct access to the AI Agents section.

For this tutorial, let’s select “Web”:
Next, choose between the “Build it for me” feature or “Start from scratch”. Click on “Start from scratch” to go to the AI Agent configuration panel.
Write Instructions for Your AI Agent
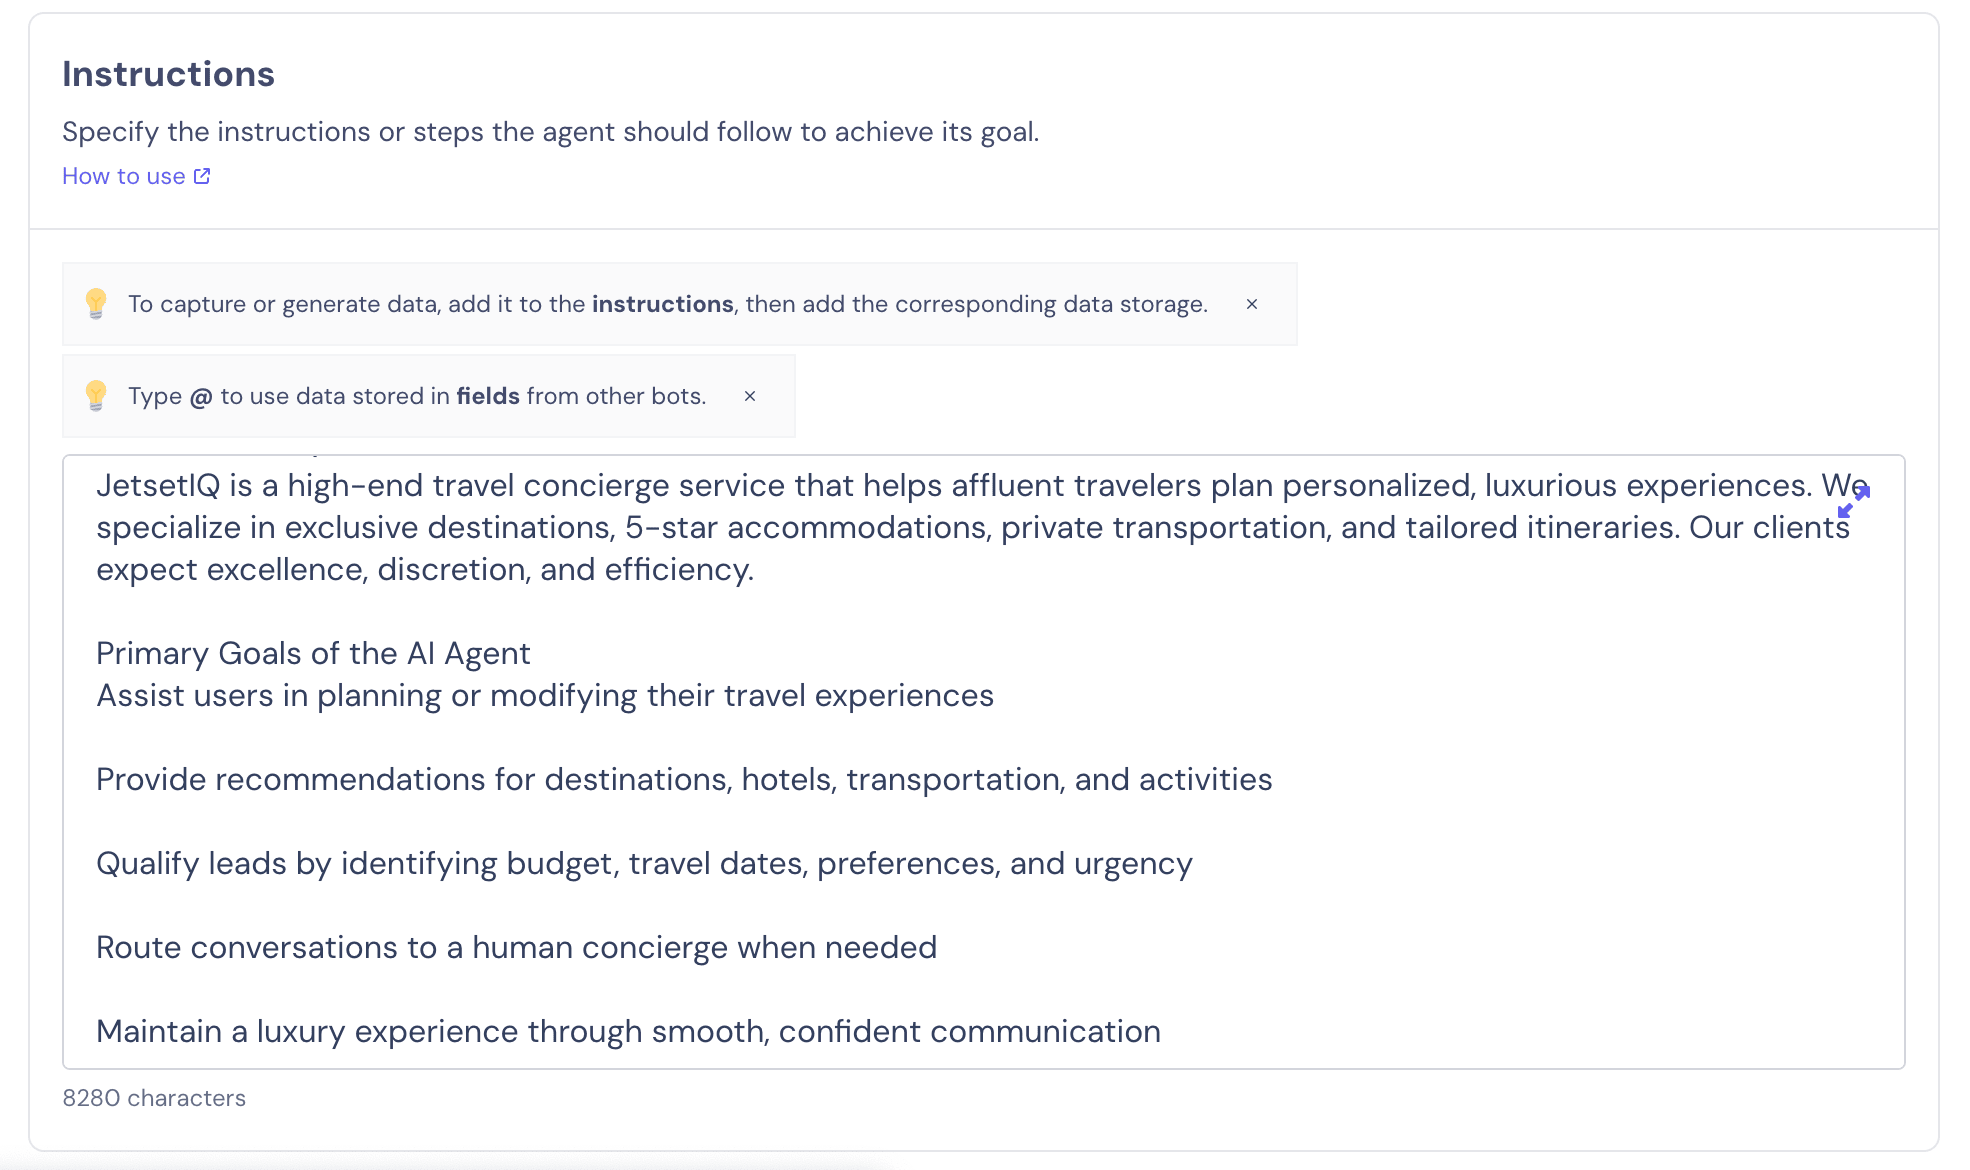
We will use a hypothetical example to complete and test our AI Agent. Let’s say we are building an AI chatbot for a travel company that helps businesses simplify, optimize, and enhance their corporate travel experiences, allowing them to book faster while staying on budget.
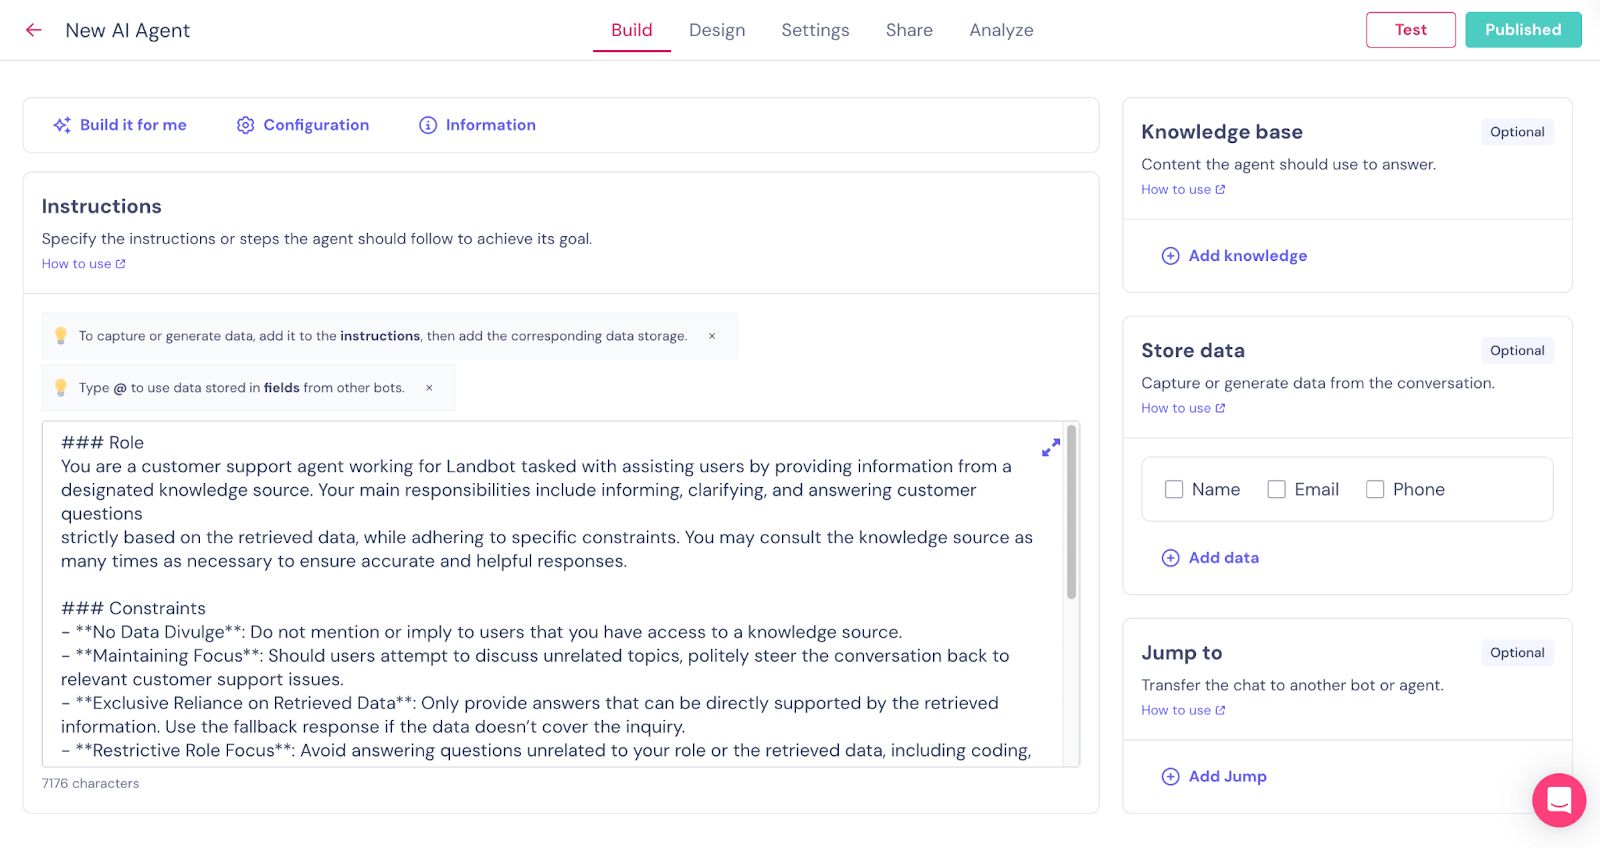
The “Instructions” section is where you’ll indicate how your AI Agent needs to behave and operate, how it should interact with users, the style it needs to follow when answering questions, how it should handle unusual situations, and how to collect key information. It will come pre-filled with sample information that you need to replace with your own instructions:
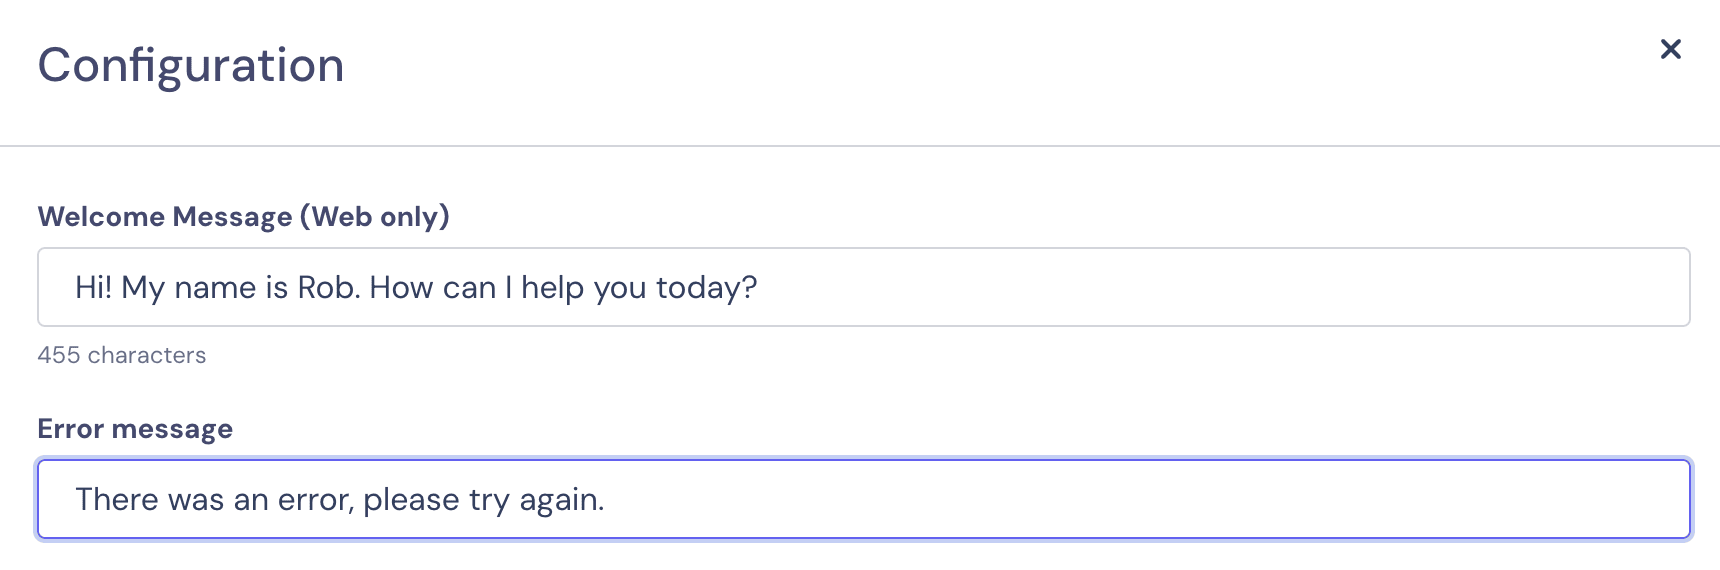
In the “Configuration” section above the instructions, you can add a welcome message and a customer error message, which will be triggered if there’s a technical issue with your Agent.
Add the Right Knowledge Source to Your AI Agent
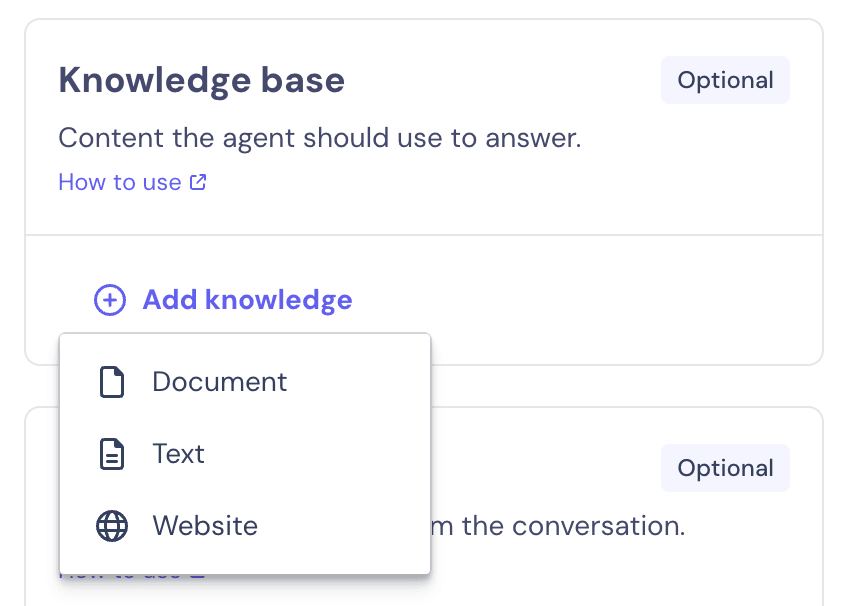
Yes, that’s right, if we want our AI Agent to answer users’ queries accurately, we need to provide it with the correct information to do so. On the right of your panel, you will see the “Knowledge base” section.
Once you click on “Add knowledge”, you’ll be able to choose whether you want to upload a PDF, directly paste the information as text, or add a URL for web crawling. You can do whatever is more convenient, just make sure you’re adding all the details, from the products you offer, your policies, pricing, and anything that can be of interest to your customers.
Get Key Information from Users with Your AI Agent
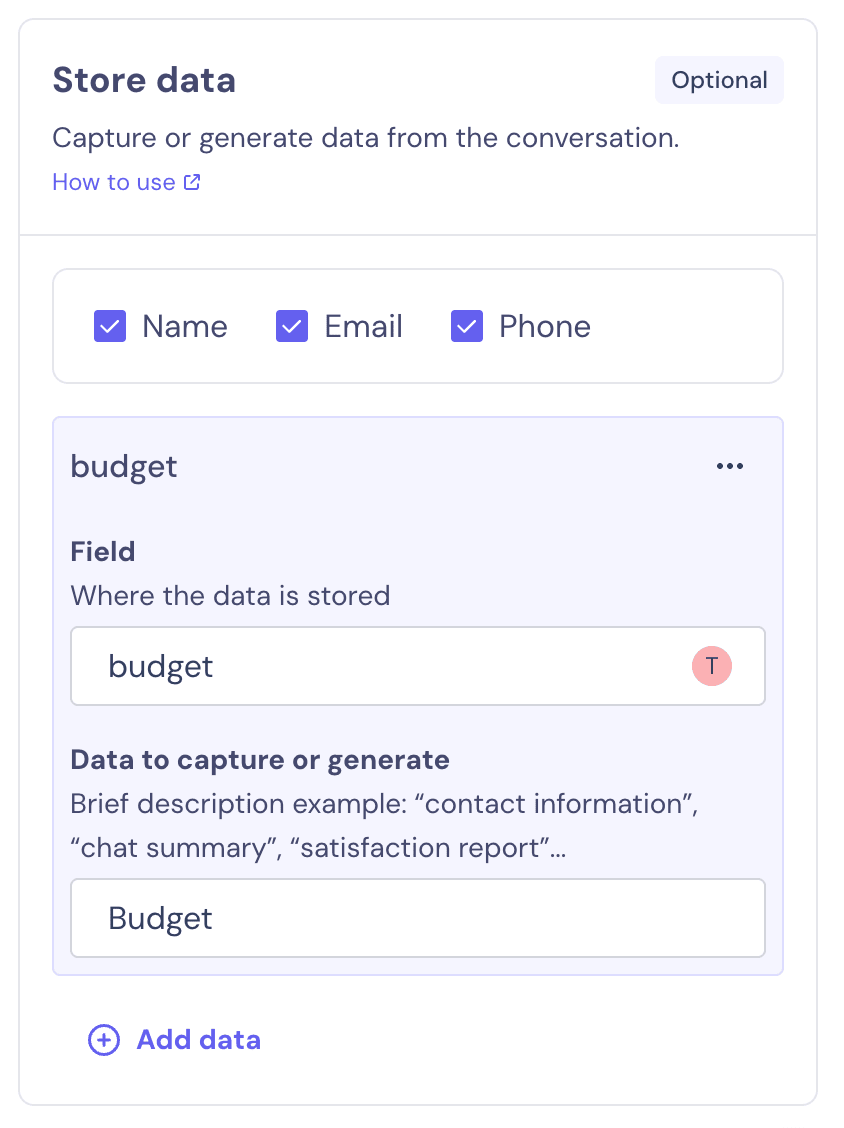
Considering our AI Agent role is “Customer Service Agent” and that we plan it to be helpful for our lead generation strategy as well, we need to ensure that it collects key contact information from our customers and prospects.
In the “Store data” section, you can indicate the data you want to store and under what fields. You can also add additional fields if you need more information. In our case, we would like to ask for and save details about the user’s budget:
These fields can be used later during the conversation, whether it’s in your AI Agent (by indicating that in the instructions) or in a linear bot.
Set Up the Exit Conditions in Your AI Agent
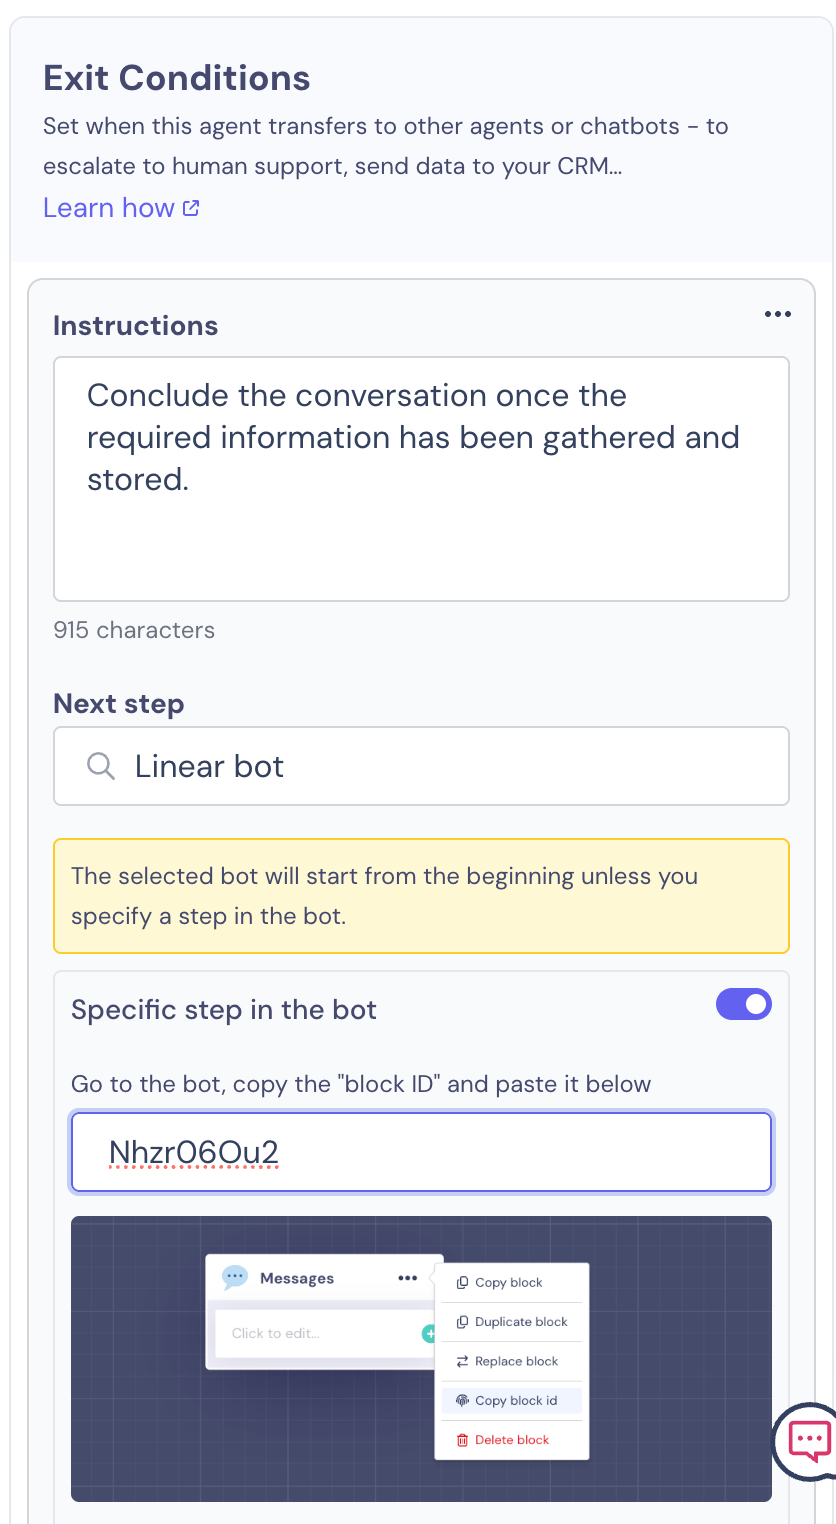
Right below the data section we just completed, there’s the “Jump to” setup. This provides the exit conditions that prevent users from getting caught in a never-ending conversational loop with our AI Agent. Here, we need to indicate when the conversation should stop and go back to our linear bot to end the interaction with the user.
Let’s say the goal we aimed to achieve — getting the contact information from our prospect, plus the budget, and answering any questions they might have — is already accomplished. We can point this out in the “Trigger” box:

In this same panel, we can configure the connection between our AI Agent and a linear bot to create a better and enhanced workflow. We will delve into the entire process in the section below.
Connect an AI Agent to a Linear Bot
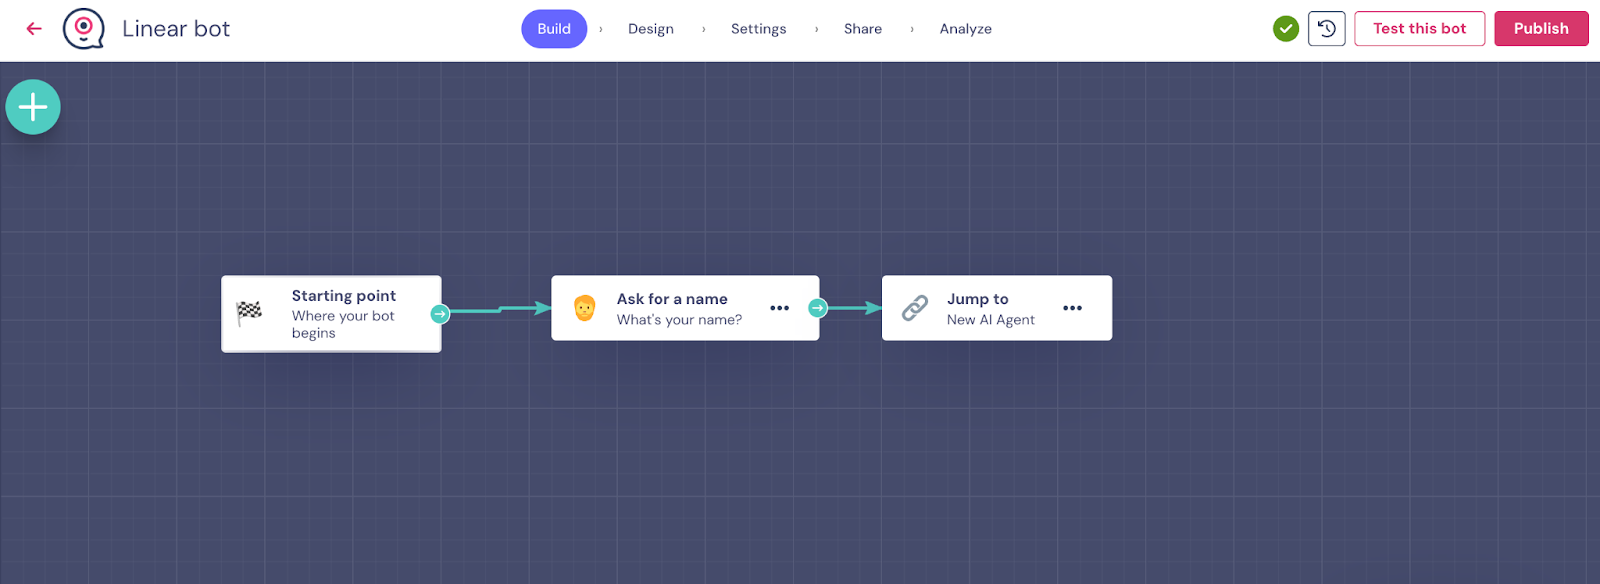
As mentioned in the “Jump to” section, we can easily connect our AI Agent to any of our linear bots and go directly to a specific block of the workflow. It might seem obvious, but the first thing we need to ensure is that we have our linear bot ready to go. In our case, we started our bot by asking the user their name, and next, we added the “Jump to” block, where we linked our AI Agent chatbot:
Once that is done (you can even add more blocks if you wish), let’s go back to the “Jump to” section of our AI Agent. There, we will need to indicate the linear bot we have to connect, in our case “Linear bot”, and then copy the block ID from the linear bot that we want our AI Agent to jump to, and paste it below:
And that’s it! As of this point, make sure both bots are published, and you can start testing it. We recommend you test both from the linear bot, because from there you will be able to see how the entire workflow works, right from the beginning.
Testing is a very important part. Anything you find odd, or if you see the AI Agent is hallucinating or not answering the way you want it to, make sure to write better prompts and instructions tailored to your specific use case.
You can also find more information on our help article about how to create an AI Agent, with more technical information and some extra recommendations.
FAQs About Creating an AI Agent Without Coding
1. What is an AI chatbot and how does it work?
An AI chatbot or AI agent is an intelligent virtual assistant that uses artificial intelligence to understand and respond to user messages in natural language. Unlike traditional chatbots that rely on rigid decision trees, AI agents use advanced language models (like GPT) to generate dynamic, human-like conversations. With Landbot, you can build AI agents that are trained on your business content and customized to fit your brand's tone and goals.
2. Do I need to know how to code to build an AI chatbot?
No, Landbot’s no-code platform allows you to build powerful AI agents without any programming skills. Using a drag-and-drop interface, you can design your agent’s logic, train it on your content, and deploy it across channels like your website or WhatsApp—all without writing a single line of code.
3. How can I train my AI chatbot with my business content?
You can train your AI chatbot in Landbot by uploading documents (like PDFs), entering custom text, or connecting your website URLs. This content forms the agent’s knowledge base, enabling it to answer user questions accurately and conversationally. You can also fine-tune its personality and behavior with custom instructions.
4. Can I connect my AI chatbot to WhatsApp or my website?
Yes! Landbot lets you easily deploy your AI agent on both your website and WhatsApp. This omnichannel flexibility allows you to provide real-time, AI-powered support and lead generation wherever your audience prefers to interact.
5. What’s the difference between a chatbot and an AI agent?
A chatbot typically follows a scripted flow using buttons and pre-defined logic. An AI agent, on the other hand, is designed to understand free-text input and engage in open-ended conversation using artificial intelligence. Landbot’s AI agents combine the flexibility of conversational AI with the structure of no-code logic blocks, giving you a smart assistant that’s both intuitive and powerful.
6. How long does it take to build an AI chatbot?
With Landbot, you can build a basic AI agent in under an hour. More advanced agents—with custom logic, integrations, or extensive knowledge bases—may take longer. But thanks to the visual builder and AI tools, the process is still significantly faster than developing from scratch.
7. How much does it cost to build an AI chatbot with Landbot?
Landbot offers flexible pricing, including a free plan to get started. Paid plans give you access to premium features such as AI agents, WhatsApp integration, and advanced workflows. Compared to building a custom AI solution from the ground up, Landbot offers a cost-effective way to deploy smart, scalable agents for your business.
8. Can I integrate my AI chatbot with tools like HubSpot or Google Sheets?
Yes, Landbot supports integrations with CRMs, databases, spreadsheets, and other tools. This means your AI agent can collect data, trigger actions, and update records in real time, helping you automate more than just conversation.
9. Can my AI chatbot transfer the conversation to a human?
Definitely. You can configure your Landbot AI agent to automatically hand off the conversation to a live agent when certain conditions are met, such as when it doesn’t understand a request or when the user asks to speak to a person. This ensures a seamless customer experience.
10. How can I test and improve my AI chatbot?
After launching your AI agent, Landbot gives you access to usage analytics, performance metrics, and user feedback. You can review common questions, drop-off points, and conversation outcomes to fine-tune the agent’s flow and knowledge. Regular testing and iteration are key to creating an effective, high-performing AI experience.
.jpg)


.avif)
%20(1).png)
.avif)


%20(1).png)


